เคยอยากทำกล้องวงจรปิดจิ๋วๆ หรือระบบจับภาพอัจฉริยะที่ส่งรูปเข้ามือถือได้ทันทีไหมครับ? วันนี้เรามีโปรเจกต์เด็ดๆ ที่ใช้บอร์ดกล้องยอดฮิตอย่าง ESP32-CAM (AI Thinker) มาถ่ายรูปแล้วอัปโหลดขึ้นไปแสดงผลบนแอป Blynk IoT แบบเรียลไทม์!
หลักการทำงานก็ง่ายๆ เลยครับ เมื่อเราส่งคำสั่ง (เช่น ส่งค่า "1" ผ่าน Datastream V1 ในแอป) ตัวบอร์ด ESP32-CAM ก็จะแชะภาพ แล้วใช้ API ตัวใหม่ของ Blynk ดันรูปนั้นขึ้นไปโชว์บน Image Widget ทั้งในเว็บและบนแอปมือถือ (iOS/Android) ได้ทันที!
⚠️ หมายเหตุ: ปัจจุบันฟีเจอร์การอัปโหลดไฟล์/รูปภาพนี้ รองรับเฉพาะผู้ใช้งานแพลตฟอร์ม Blynk ในแพ็กเกจ PRO และ PRODUCTION เท่านั้นนะครับ
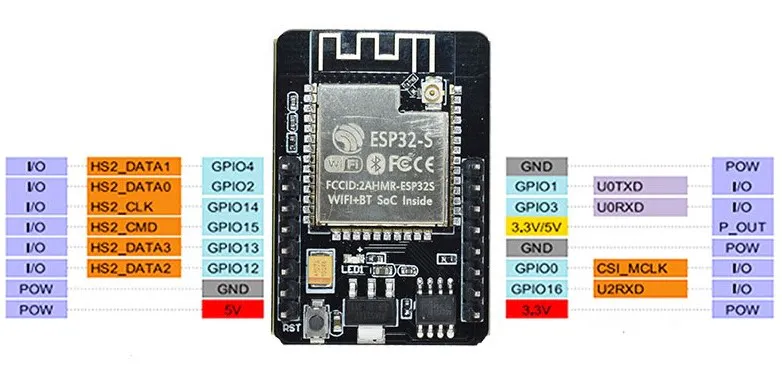
ฮาร์ดแวร์และการต่อวงจร (Hardware & Schematics)
โปรเจกต์นี้ใช้ของน้อยมากครับ มีแค่บอร์ด ESP32-CAM ตัวเดียวจบ! แต่เนื่องจากบอร์ดรุ่นนี้ไม่มีพอร์ต USB ในตัว เวลาจะอัปโหลดโค้ด คุณต้องต่อผ่านบอร์ด USB-to-Serial (FTDI) เสียก่อน โดยให้ต่อตามวงจรด้านล่างนี้ และอย่าลืม ช็อตขา IO0 เข้ากับ GND ตอนกดอัปโหลดโค้ดด้วยนะครับ
ซอร์สโค้ด (Source Code) และการตั้งค่า
ในการคอมไพล์โค้ด คุณจะต้องสร้างไฟล์ 2 ไฟล์ไว้ในโฟลเดอร์เดียวกัน คือไฟล์หลัก ESP32-cam-uploadphoto-Blynk.ino และไฟล์เก็บค่าพินของกล้อง camera_pins.h
สิ่งที่ต้องแก้ในโค้ดก่อนใช้งาน:
- ใส่
BLYNK_TEMPLATE_ID, BLYNK_TEMPLATE_NAME และ BLYNK_AUTH_TOKEN จากในหน้า Device Info ของคุณ
- ใส่ชื่อและรหัสผ่าน Wi-Fi ของคุณใน
ssid และ password
- อัปเดต
serverName ให้ตรงกับเซิร์ฟเวอร์ของคุณ (เช่น fra1.blynk.cloud หรือ blynk.cloud)
คลิกเพื่อดูโครงสร้างไฟล์ และคัดลอกโค้ดฉบับเต็ม (View More)

(โครงสร้างโฟลเดอร์ต้องมี 2 ไฟล์นี้อยู่ด้วยกัน)
ไฟล์ที่ 1: ESP32-cam-uploadphoto-Blynk.ino
/* Fill-in information from Blynk Device Info here */
#define BLYNK_TEMPLATE_ID           "TMPxxxxxx"
#define BLYNK_TEMPLATE_NAME         "Device"
#define BLYNK_AUTH_TOKEN            "YourAuthToken"

#define BLYNK_PRINT Serial

#include <Arduino.h>
#include <WiFi.h>
#include <WiFiClient.h>
#include <BlynkSimpleEsp32.h>
#include "soc/soc.h"
#include "soc/rtc_cntl_reg.h"
#include "esp_camera.h"

const char* ssid = "YourNetworkName";
const char* password = "YourPassword";

#define CAMERA_MODEL_AI_THINKER // Has PSRAM
#include "camera_pins.h"

String serverName = "YouServerHostName";
String serverPath = "/external/api/upload?token=" + String(BLYNK_AUTH_TOKEN);
const int serverPort = 80;
WiFiClient client;

// Pins for CAMERA_MODEL_AI_THINKER
#define PWDN_GPIO_NUM     32
#define RESET_GPIO_NUM    -1
#define XCLK_GPIO_NUM      0
#define SIOD_GPIO_NUM     26
#define SIOC_GPIO_NUM     27
#define Y9_GPIO_NUM       35
#define Y8_GPIO_NUM       34
#define Y7_GPIO_NUM       39
#define Y6_GPIO_NUM       36
#define Y5_GPIO_NUM       21
#define Y4_GPIO_NUM       19
#define Y3_GPIO_NUM       18
#define Y2_GPIO_NUM        5
#define VSYNC_GPIO_NUM    25
#define HREF_GPIO_NUM     23
#define PCLK_GPIO_NUM     22

BLYNK_WRITE(V1) {
  int pinValue = param.asInt();
  if (pinValue == 1){
    Serial.print("My pin value:");
    Serial.println(pinValue);
    sendPhoto();
  }
}

void setup() {
  Serial.begin(115200);
  Blynk.begin(BLYNK_AUTH_TOKEN, ssid, password);
  delay(3000);
  WRITE_PERI_REG(RTC_CNTL_BROWN_OUT_REG, 0);
  WiFi.mode(WIFI_STA);
  Serial.print("Connecting to ");
  Serial.println(ssid);

  while (WiFi.status() != WL_CONNECTED) {
    Serial.print(".");
    delay(500);
  }
  Serial.println();
  Serial.print("ESP32-CAM IP Address: ");
  Serial.println(WiFi.localIP());

  Serial.println("INIT CAMERA");
  camera_config_t config;
  config.grab_mode = CAMERA_GRAB_LATEST;
  config.ledc_channel = LEDC_CHANNEL_0;
  config.ledc_timer = LEDC_TIMER_0;
  config.pin_d0 = Y2_GPIO_NUM;
  config.pin_d1 = Y3_GPIO_NUM;
  config.pin_d2 = Y4_GPIO_NUM;
  config.pin_d3 = Y5_GPIO_NUM;
  config.pin_d4 = Y6_GPIO_NUM;
  config.pin_d5 = Y7_GPIO_NUM;
  config.pin_d6 = Y8_GPIO_NUM;
  config.pin_d7 = Y9_GPIO_NUM;
  config.pin_xclk = XCLK_GPIO_NUM;
  config.pin_pclk = PCLK_GPIO_NUM;
  config.pin_vsync = VSYNC_GPIO_NUM;
  config.pin_href = HREF_GPIO_NUM;
  config.pin_sscb_sda = SIOD_GPIO_NUM;
  config.pin_sscb_scl = SIOC_GPIO_NUM;
  config.pin_pwdn = PWDN_GPIO_NUM;
  config.pin_reset = RESET_GPIO_NUM;
  config.xclk_freq_hz = 20000000;
  config.pixel_format = PIXFORMAT_JPEG;

  config.frame_size = FRAMESIZE_QVGA;
  config.jpeg_quality = 10;
  config.fb_count = 1;

  if(psramFound()){
    config.frame_size = FRAMESIZE_SVGA;
    config.jpeg_quality = 10;
    config.fb_count = 2;
  } else {
    config.frame_size = FRAMESIZE_CIF;
    config.jpeg_quality = 12;
    config.fb_count = 1;
  }

  esp_err_t err = esp_camera_init(&config);
  if (err != ESP_OK) {
    Serial.printf("Camera init failed with error 0x%x", err);
    return;
  }
}

void loop() {
  Blynk.run();
}

String sendPhoto() {
  String getAll;
  String getBody;

  camera_fb_t * fb = NULL;
  fb = esp_camera_fb_get();
  esp_camera_fb_return(fb);
  fb = NULL;
  fb = esp_camera_fb_get();
  if(!fb) {
    Serial.println("Camera capture failed");
    delay(1000);
    ESP.restart();
  }

  Serial.println("Connecting to server: " + serverName);

  if (client.connect(serverName.c_str(), serverPort)) {
    Serial.println("Connection successful!");
    String head = "--Blynk\r\nContent-Disposition: form-data; name=\"upfile\"; filename=\"esp32-cam.jpg\"\r\nContent-Type: image/jpeg\r\n\r\n";
    String tail = "\r\n--Blynk--\r\n";

    uint32_t imageLen = fb->len;
    uint32_t extraLen = head.length() + tail.length();
    uint32_t totalLen = imageLen + extraLen;

    client.println("POST " + serverPath + " HTTP/1.1");
    client.println("Host: " + serverName);
    client.println("Content-Length: " + String(totalLen));
    client.println("Content-Type: multipart/form-data; boundary=Blynk");
    client.println();
    client.print(head);

    uint8_t *fbBuf = fb->buf;
    size_t fbLen = fb->len;
    for (size_t n=0; n<fbLen; n=n+1024) {
      if (n+1024 < fbLen) {
        client.write(fbBuf, 1024);
        fbBuf += 1024;
      }
      else if (fbLen%1024>0) {
        size_t remainder = fbLen%1024;
        client.write(fbBuf, remainder);
      }
    }
    client.print(tail);

    esp_camera_fb_return(fb);

    int timoutTimer = 10000;
    long startTimer = millis();
    boolean state = false;

    while ((startTimer + timoutTimer) > millis()) {
      Serial.print(".");
      delay(100);
      while (client.available()) {
        char c = client.read();
        if (c == '\n') {
          if (getAll.length()==0) { state=true; }
          getAll = "";
        }
        else if (c != '\r') { getAll += String(c); }
        if (state==true) {
          if (c != '\n') {
          getBody += String(c);
        }
      }
        startTimer = millis();
      }
      if (getBody.length()>0) { break; }
    }
    Serial.println();
    client.stop();
    Serial.println(getBody);
    delay(1500);

    Blynk.setProperty(V0, "offImageUrl", getBody);
    Blynk.logEvent("event_code");
  }
  else {
    getBody = "Connection to " + serverName +  " failed.";
    Serial.println(getBody);
  }
  return getBody;
}
ไฟล์ที่ 2: camera_pins.h
#if defined(CAMERA_MODEL_WROVER_KIT)
#define PWDN_GPIO_NUM  -1
#define RESET_GPIO_NUM -1
#define XCLK_GPIO_NUM  21
#define SIOD_GPIO_NUM  26
#define SIOC_GPIO_NUM  27
#define Y9_GPIO_NUM    35
#define Y8_GPIO_NUM    34
#define Y7_GPIO_NUM    39
#define Y6_GPIO_NUM    36
#define Y5_GPIO_NUM    19
#define Y4_GPIO_NUM    18
#define Y3_GPIO_NUM    5
#define Y2_GPIO_NUM    4
#define VSYNC_GPIO_NUM 25
#define HREF_GPIO_NUM  23
#define PCLK_GPIO_NUM  22

#elif defined(CAMERA_MODEL_ESP_EYE)
#define PWDN_GPIO_NUM  -1
#define RESET_GPIO_NUM -1
#define XCLK_GPIO_NUM  4
#define SIOD_GPIO_NUM  18
#define SIOC_GPIO_NUM  23
#define Y9_GPIO_NUM    36
#define Y8_GPIO_NUM    37
#define Y7_GPIO_NUM    38
#define Y6_GPIO_NUM    39
#define Y5_GPIO_NUM    35
#define Y4_GPIO_NUM    14
#define Y3_GPIO_NUM    13
#define Y2_GPIO_NUM    34
#define VSYNC_GPIO_NUM 5
#define HREF_GPIO_NUM  27
#define PCLK_GPIO_NUM  25
#define LED_GPIO_NUM   22

#elif defined(CAMERA_MODEL_M5STACK_PSRAM)
#define PWDN_GPIO_NUM  -1
#define RESET_GPIO_NUM 15
#define XCLK_GPIO_NUM  27
#define SIOD_GPIO_NUM  25
#define SIOC_GPIO_NUM  23
#define Y9_GPIO_NUM    19
#define Y8_GPIO_NUM    36
#define Y7_GPIO_NUM    18
#define Y6_GPIO_NUM    39
#define Y5_GPIO_NUM    5
#define Y4_GPIO_NUM    34
#define Y3_GPIO_NUM    35
#define Y2_GPIO_NUM    32
#define VSYNC_GPIO_NUM 22
#define HREF_GPIO_NUM  26
#define PCLK_GPIO_NUM  21

#elif defined(CAMERA_MODEL_AI_THINKER)
#define PWDN_GPIO_NUM  32
#define RESET_GPIO_NUM -1
#define XCLK_GPIO_NUM  0
#define SIOD_GPIO_NUM  26
#define SIOC_GPIO_NUM  27
#define Y9_GPIO_NUM    35
#define Y8_GPIO_NUM    34
#define Y7_GPIO_NUM    39
#define Y6_GPIO_NUM    36
#define Y5_GPIO_NUM    21
#define Y4_GPIO_NUM    19
#define Y3_GPIO_NUM    18
#define Y2_GPIO_NUM    5
#define VSYNC_GPIO_NUM 25
#define HREF_GPIO_NUM  23
#define PCLK_GPIO_NUM  22
#define LED_GPIO_NUM   4

#else
#error "Camera model not selected"
#endif
สรุป: นี่คือไอเดียเด็ดๆ ในการประยุกต์ใช้บอร์ด ESP32-CAM ร่วมกับแพลตฟอร์มระดับโปรอย่าง Blynk IoT ครับ นอกจากการสั่งให้ถ่ายรูปแล้ว คุณยังสามารถต่อยอดไปใช้กับเซ็นเซอร์จับการเคลื่อนไหว (PIR) เพื่อทำเป็นกล้องวงจรปิดดักจับขโมยได้อีกด้วย! ลองเอาไปปรับใช้กันดูนะครับ
อยากได้บอร์ด ESP32-CAM ไปทำกล้องจิ๋วแสนรู้ของตัวเองไหม?
คำเตือน: เนื้อหานี้เป็นการสรุปและเรียบเรียงจากบทความต้นฉบับภาษาอังกฤษ ข้อมูลฉบับภาษาไทยอาจมีความคลาดเคลื่อนบางประการจากการตีความหรือย่อเนื้อหา


