
ML Business Card
นามบัตรอัจฉริยะที่รัน Machine Learning ได้จริง

จินตนาการว่าคุณมีนามบัตรที่ไม่ใช่แค่กระดาษธรรมดา แต่เป็น PCB ที่มี Microcontroller, Microphone, LED และที่สำคัญคือสามารถรัน Machine Learning Model ได้จริง! โปรเจค ML Business Card นี้เป็นการผสมผสานระหว่าง Hardware Design, PCB Engineering และ TinyML (Tiny Machine Learning) เข้าด้วยกัน โดยใช้ RP2040 เป็นสมองหลัก พร้อม TensorFlow Lite Micro สำหรับรัน Neural Network บนนามบัตรขนาดพกพา ที่สามารถเสียบ USB-C เข้าคอมพิวเตอร์และทำงานได้ทันที เหมาะสำหรับผู้ที่ต้องการโชว์ฝีมือด้าน Embedded AI และ PCB Design
ภาพรวมโปรเจค
ML Business Card เป็นนามบัตรอิเล็กทรอนิกส์ที่ออกแบบให้มีขนาดเท่ากับนามบัตรมาตรฐาน (85.6 × 53.98 mm) แต่บรรจุเทคโนโลยีขั้นสูงไว้ภายใน สามารถเสียบเข้า USB Port ของคอมพิวเตอร์และทำงานได้ทันที
🤖 TinyML
รัน Machine Learning Model บนชิป RP2040 ด้วย TensorFlow Lite Micro สำหรับ Audio Classification
🎤 Audio Processing
มี MEMS Microphone สำหรับรับเสียงและประมวลผลแบบ Real-time
💡 LED Display
LED หลายดวงแสดงผลการทำงานของ ML Model อย่างสวยงาม
🔌 USB-C
เสียบเข้า USB-C Port ได้เลย ไม่ต้องใช้สายเพิ่ม พร้อม Flash Storage
แนวคิดของโปรเจคนี้มาจากการต้องการสร้างนามบัตรที่ไม่ธรรมดา แทนที่จะเป็นกระดาษที่มีแค่ชื่อและเบอร์โทร ทำไมไม่ทำให้มันเป็น "Interactive Demo" ที่แสดงความสามารถด้าน Embedded AI ได้เลย?
นามบัตรนี้สามารถ:
- รับเสียง - ผ่าน MEMS Microphone
- ประมวลผล - ด้วย Neural Network บน RP2040
- แสดงผล - ผ่าน LED ที่สวยงาม
- เชื่อมต่อ - เสียบ USB-C เข้าคอมพิวเตอร์ได้เลย
🔧 ข้อมูลทางเทคนิค
- MCU: RP2040 (Dual-core ARM Cortex-M0+ @ 133 MHz)
- Memory: 264 KB SRAM + 2 MB Flash
- Microphone: MEMS Digital Microphone
- LEDs: Multiple RGB/Single-color LEDs
- Interface: USB-C (Data + Power)
- Size: 85.6 × 53.98 mm (Business Card Standard)
- ML Framework: TensorFlow Lite Micro
💡 ทำไมต้องใช้ RP2040?
RP2040 เป็นตัวเลือกที่ดีเยี่ยมสำหรับ TinyML เพราะ:
- ✅ มี Dual-core ทำงานได้เร็ว (133 MHz)
- ✅ RAM เยอะพอสำหรับ Neural Network (264 KB)
- ✅ ราคาถูก (~$1 ต่อชิป)
- ✅ มี USB Native Support
- ✅ Community และ Library เยอะ
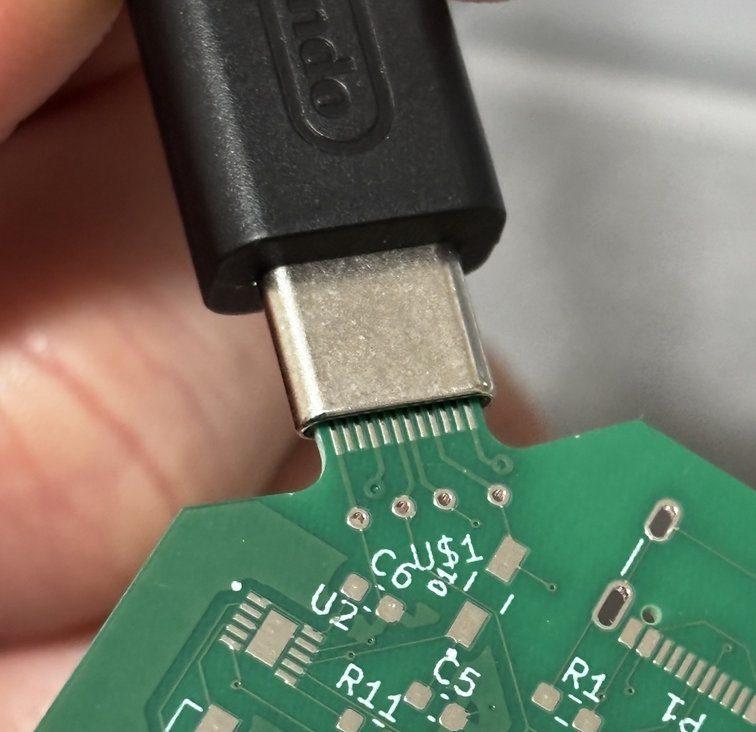
นามบัตรพร้อม USB-C Connector ที่เสียบเข้าคอมพิวเตอร์ได้เลย
Hardware Design
การออกแบบฮาร์ดแวร์ของนามบัตรนี้ต้องคำนึงถึงหลายปัจจัย ทั้งขนาด, การใช้งาน และความสวยงาม
RP2040 เป็น Microcontroller ที่ออกแบบโดย Raspberry Pi Foundation มีคุณสมบัติที่เหมาะสำหรับ TinyML:
- Dual-core ARM Cortex-M0+ - ทำงานได้ 133 MHz
- 264 KB SRAM - เพียงพอสำหรับ Neural Network ขนาดเล็ก
- 30 GPIO Pins - ต่อ Peripheral ได้เยอะ
- USB 1.1 Controller - ไม่ต้องใช้ USB-to-Serial Chip เพิ่ม
- PIO (Programmable I/O) - สร้าง Protocol แปลกๆ ได้
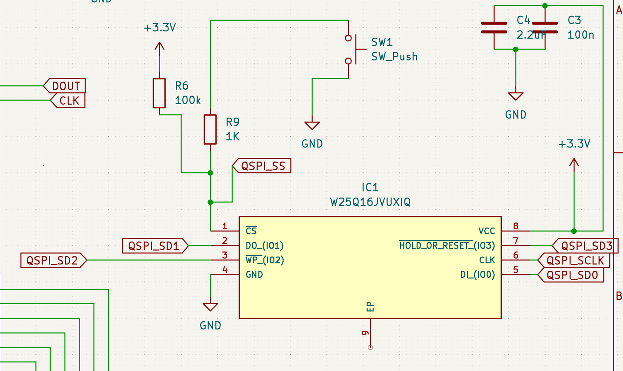
ใช้ MEMS (Micro-Electro-Mechanical Systems) Microphone แบบ Digital Output เช่น:
- PDM (Pulse Density Modulation) - Output แบบ Digital
- I2S Interface - เชื่อมต่อกับ RP2040 ผ่าน I2S
- ขนาดเล็ก - ประมาณ 3.5 × 2.6 mm
- Sensitivity สูง - จับเสียงได้ดีในระยะใกล้
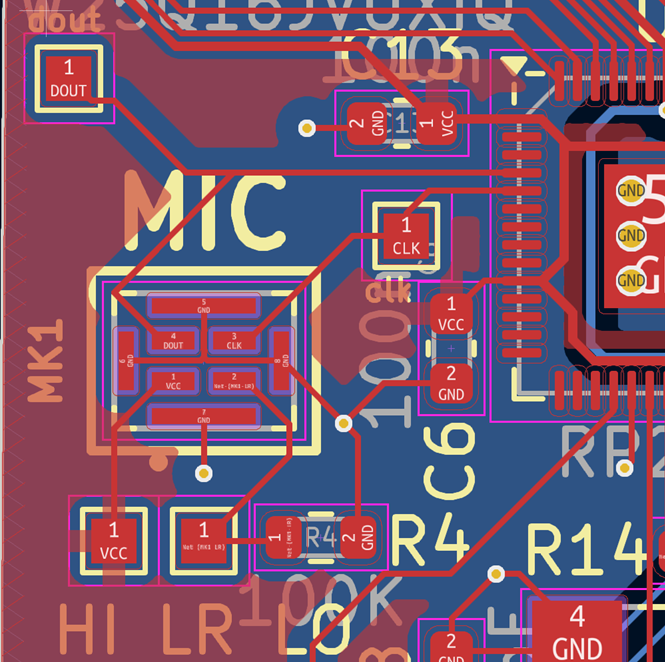
วงจร MEMS Microphone ใน KiCad
LED ใช้แสดงผลการทำงานของ ML Model แบบ Real-time:
- RGB LEDs - แสดงสีต่างๆ ตามผลการจำแนก
- Single-color LEDs - แสดงสถานะการทำงาน
- PWM Control - ปรับความสว่างได้
- Pattern Animation - สร้าง Effect สวยงาม
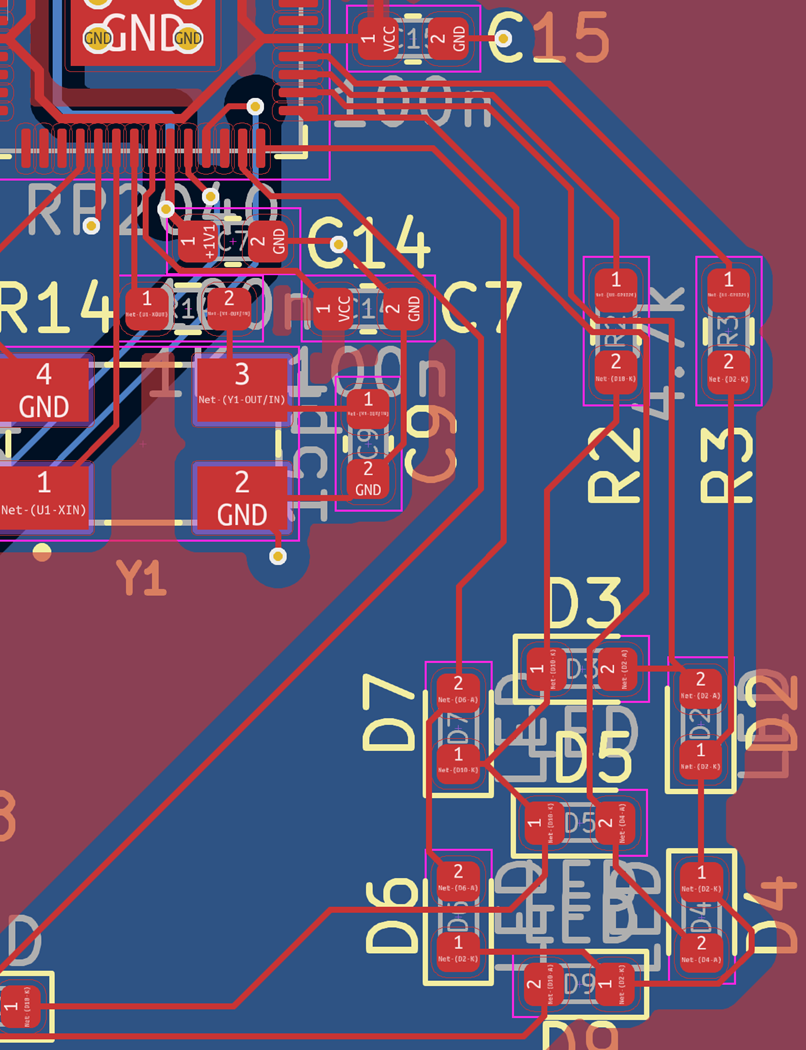
วงจร LED ชุดที่ 1
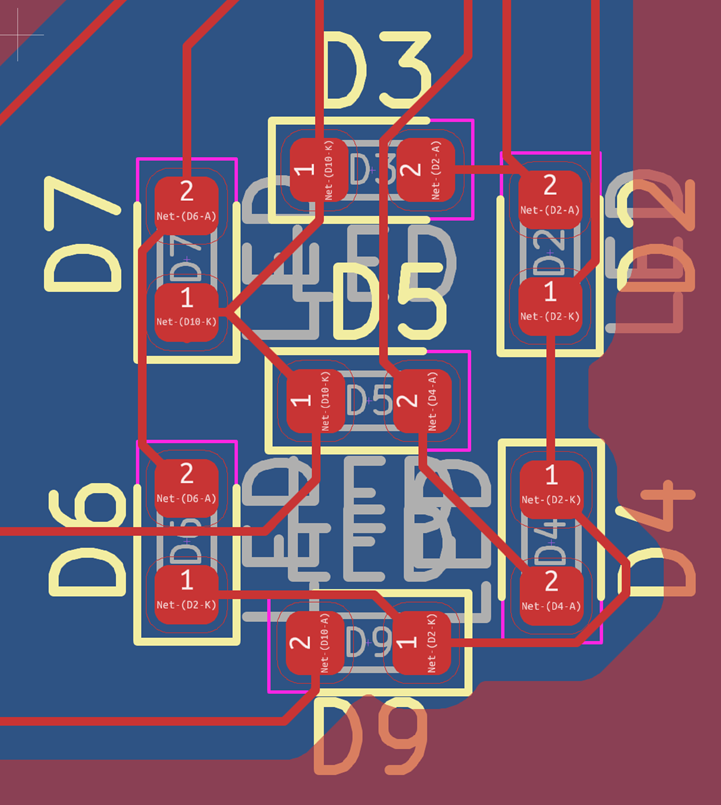
วงจร LED ชุดที่ 2
USB-C Connector ออกแบบให้เสียบเข้า USB Port ได้โดยตรง:
- USB 2.0 Data Lines - D+ และ D- เชื่อมต่อกับ RP2040
- Power (5V) - รับไฟจาก USB Host
- CC Pins - ใช้ Resistor ตั้งค่าเป็น USB Device
- ESD Protection - ป้องกันไฟฟ้าสถิต
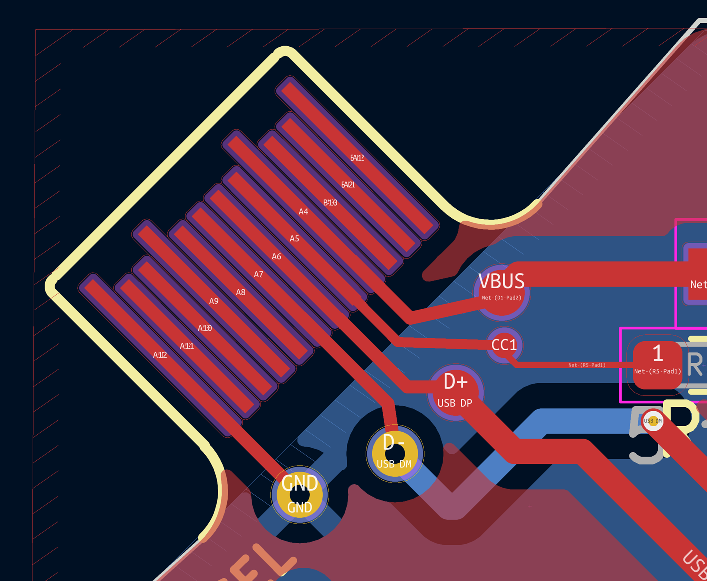
วงจร USB-C Interface ใน KiCad
ใช้ External Flash สำหรับเก็บ:
- Firmware - โปรแกรมหลัก
- ML Model - Neural Network Weights
- Audio Samples - ข้อมูลเสียงสำหรับทดสอบ
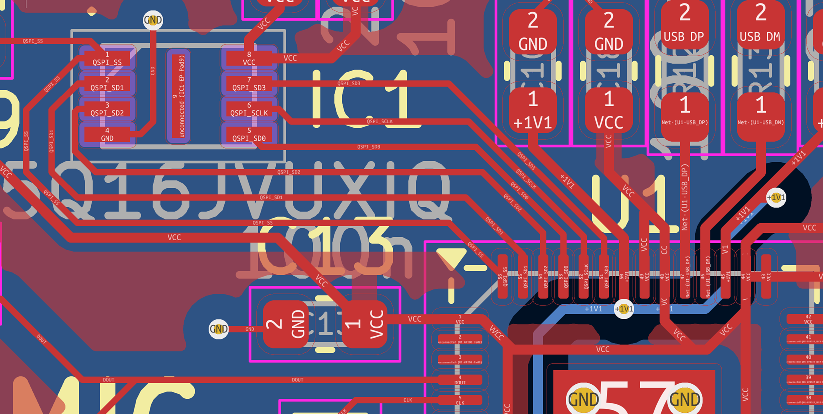
วงจร Flash Memory ใน KiCad
⚠️ ข้อควรระวังในการออกแบบ:
- ขนาด PCB ต้องไม่เกิน 85.6 × 53.98 mm (มาตรฐานนามบัตร)
- USB-C Connector ต้องอยู่ขอบ PCB เพื่อเสียบได้
- Component ต้องเป็น SMD ขนาดเล็ก (0402, 0603)
- ต้องมี Decoupling Capacitor ใกล้ๆ RP2040
- USB Data Lines ต้อง Match Impedance (90Ω Differential)
PCB Design Process
การออกแบบ PCB สำหรับนามบัตรนี้ใช้ KiCad ซึ่งเป็น Open-source PCB Design Software
Schematic ทั้งหมดของ ML Business Card ใน KiCad
Schematic แบ่งออกเป็นส่วนหลักๆ:
- Power Supply - รับ 5V จาก USB แปลงเป็น 3.3V ด้วย LDO
- RP2040 Core - MCU พร้อม Crystal และ Decoupling Caps
- USB Interface - USB-C Connector พร้อม ESD Protection
- Flash Memory - QSPI Flash สำหรับเก็บโปรแกรม
- Microphone - MEMS Mic พร้อม I2S Interface
- LEDs - RGB และ Single-color LEDs
- Programming Interface - SWD Pads สำหรับ Debug
PCB Layout ใน KiCad - แสดง Component Placement
การวาง Component บน PCB:
- USB-C Connector - อยู่ขอบด้านบนเพื่อเสียบได้
- RP2040 - อยู่ตรงกลาง PCB
- Flash - ใกล้ๆ RP2040 เพื่อลด Trace Length
- Microphone - อยู่ด้านหน้า PCB เพื่อรับเสียงได้ดี
- LEDs - กระจายรอบๆ PCB เพื่อความสวยงาม

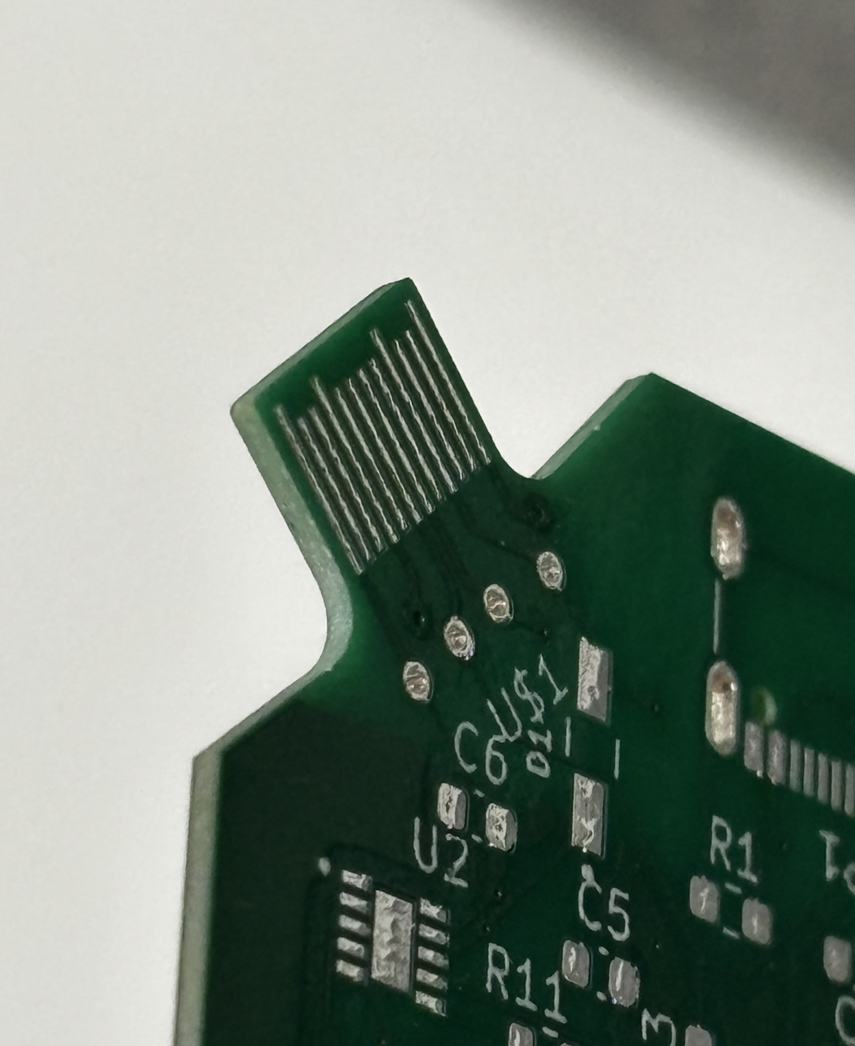
PCB พร้อม Cutout สำหรับ USB-C Connector
มี Cutout (ช่องว่าง) ที่ขอบ PCB เพื่อให้ USB-C Connector เสียบเข้า USB Port ได้ลึกพอ
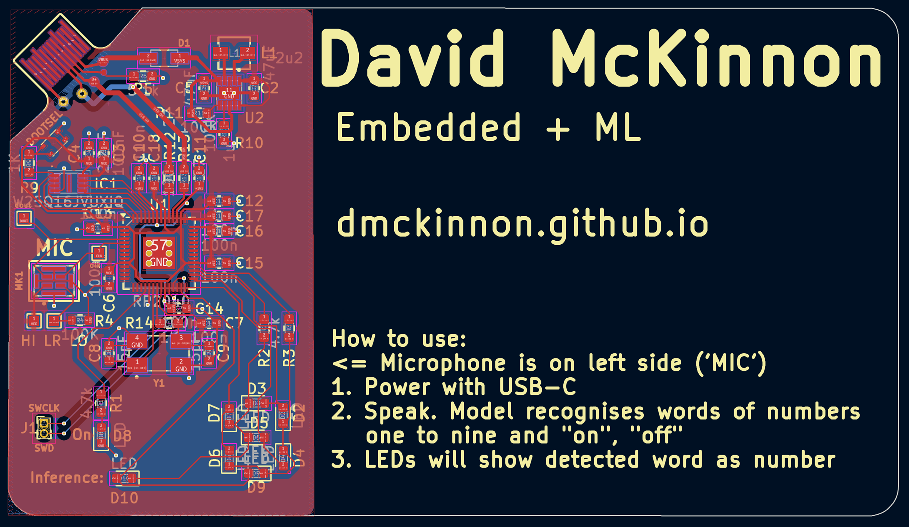
Silkscreen (ตัวอักษรบน PCB) ออกแบบให้สวยงามและมีข้อมูล:
- ชื่อ-นามสกุล - ข้อมูลส่วนตัว
- ตำแหน่งงาน - เช่น "Embedded AI Engineer"
- ข้อมูลติดต่อ - Email, Website, GitHub
- Logo - โลโก้ส่วนตัวหรือบริษัท
- QR Code - ลิงก์ไปยัง Portfolio
🔧 PCB Specifications
- Layers: 4 Layers (Top, GND, Power, Bottom)
- Thickness: 1.6 mm
- Copper Weight: 1 oz (35 µm)
- Min Trace Width: 0.15 mm
- Min Clearance: 0.15 mm
- Via Size: 0.3 mm drill, 0.6 mm pad
- Surface Finish: ENIG (Gold) หรือ HASL
- Solder Mask: สีดำหรือสีเขียว
💡 Tips สำหรับ PCB Design:
- ✅ ใช้ Ground Plane เต็มพื้นที่เพื่อลด Noise
- ✅ USB Data Lines ต้อง Match Length และ Impedance
- ✅ Decoupling Caps ต้องใกล้ๆ Power Pins
- ✅ High-speed Signals (QSPI) ต้องสั้นและ Match Length
- ✅ ใช้ Via Stitching รอบๆ High-speed Signals
- ✅ Microphone ต้องมี Acoustic Port (รูบน PCB)
Machine Learning
หัวใจสำคัญของโปรเจคนี้คือการรัน Machine Learning Model บนนามบัตร ใช้ TensorFlow Lite Micro
TinyML (Tiny Machine Learning) คือการรัน Machine Learning บนอุปกรณ์ขนาดเล็กที่มีทรัพยากรจำกัด เช่น Microcontroller
ข้อดีของ TinyML:
- ✅ Low Latency - ประมวลผลแบบ Real-time ไม่ต้องส่งข้อมูลไป Cloud
- ✅ Privacy - ข้อมูลไม่ออกจากอุปกรณ์
- ✅ Low Power - ใช้ไฟน้อย เหมาะกับ Battery-powered
- ✅ No Internet - ทำงานได้โดยไม่ต้องต่อ Internet
โปรเจคนี้ใช้ ML สำหรับ Audio Classification - จำแนกเสียงที่ได้ยินว่าเป็นเสียงอะไร เช่น:
- 🗣️ Speech - เสียงพูด
- 👏 Clap - เสียงปรบมือ
- 🎵 Music - เสียงดนตรี
- 🔇 Silence - เงียบ
ใช้ Neural Network แบบ Convolutional Neural Network (CNN) ขนาดเล็ก:
ขั้นตอนการประมวลผลเสียง:
- Audio Capture - รับเสียงจาก MEMS Mic ผ่าน I2S (16 kHz, 16-bit)
- Windowing - แบ่งเสียงเป็น Frame ขนาด 1 วินาที
- FFT - แปลงเป็น Frequency Domain
- Mel Spectrogram - สร้าง Spectrogram แบบ Mel Scale
- Normalization - ปรับค่าให้อยู่ในช่วง 0-1
- Inference - ป้อนเข้า Neural Network
- Post-processing - เลือก Class ที่มี Confidence สูงสุด
TensorFlow Lite Micro เป็น Framework สำหรับรัน TensorFlow Model บน Microcontroller:
🎓 Model Training Process:
- Data Collection - รวบรวมเสียงตัวอย่าง (Dataset)
- Preprocessing - แปลงเป็น Spectrogram
- Training - Train Model ด้วย TensorFlow/Keras
- Quantization - แปลงเป็น INT8 เพื่อลดขนาด
- Conversion - แปลงเป็น TFLite Micro Format
- Deployment - Flash ลง RP2040
⚡ Performance
- Inference Time: ~100 ms ต่อ Frame
- Accuracy: ~85-90% (ขึ้นกับ Dataset)
- Memory Usage: ~60 KB RAM, ~200 KB Flash
- Power Consumption: ~50 mA @ 3.3V
- Latency: < 200 ms (Real-time)
Assembly & Soldering
หลังจากได้ PCB มาแล้ว ต้องประกอบ Component ทั้งหมด ซึ่งเป็น SMD ขนาดเล็ก
- Soldering Iron - หัวแร้งขนาดเล็ก (0.5-1 mm tip)
- Solder Wire - ตะกั่วขนาด 0.5 mm
- Flux - ช่วยให้ตะกั่วไหลดีขึ้น
- Tweezers - หยิบ Component ขนาดเล็ก
- Magnifying Glass - แว่นขยายหรือกล้อง
- Multimeter - ตรวจสอบวงจร
- Hot Air Station - (Optional) สำหรับ Reflow
- เตรียม PCB - ทำความสะอาด PCB ด้วย Isopropyl Alcohol
- Apply Solder Paste - (ถ้าใช้ Reflow) ทา Solder Paste บน Pads
- Place Components - วาง Component ตามตำแหน่ง เริ่มจากตัวเล็กสุด (0402)
- Solder RP2040 - บัดกรี RP2040 (QFN Package) ด้วย Hot Air หรือ Reflow Oven
- Solder Passives - บัดกรี Resistor, Capacitor ทั้งหมด
- Solder ICs - บัดกรี Flash, LDO และ IC อื่นๆ
- Solder Connectors - บัดกรี USB-C Connector
- Solder LEDs - บัดกรี LED ทั้งหมด
- Inspection - ตรวจสอบด้วยแว่นขยาย หา Short Circuit
- Testing - ทดสอบวงจรด้วย Multimeter
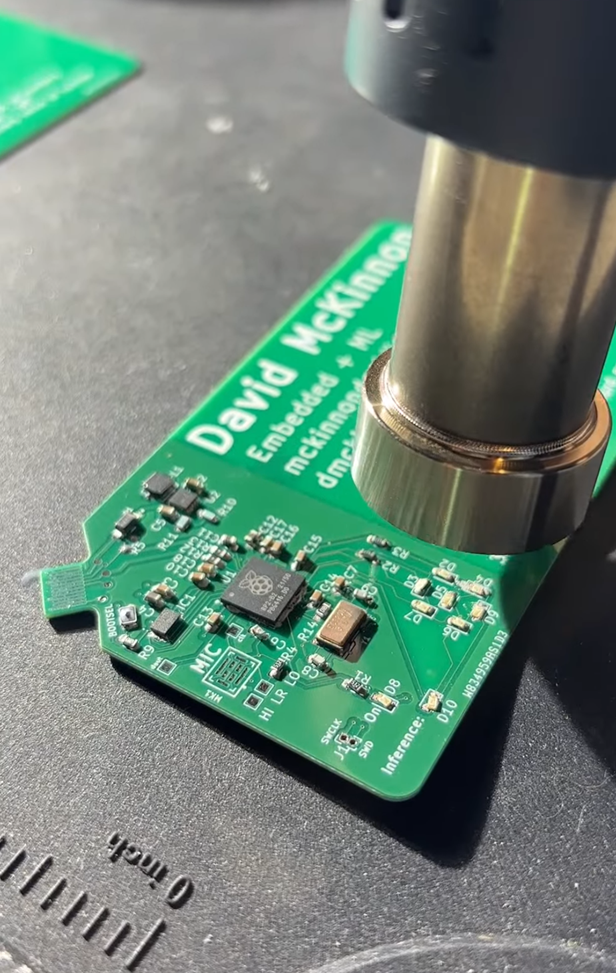
ขั้นตอนการบัดกรี Component บน PCB
⚠️ ข้อควรระวังในการบัดกรี:
- RP2040 เป็น QFN Package มี Thermal Pad ใต้ชิป ต้องใช้ Hot Air หรือ Reflow
- USB-C Connector มี Pin เยอะและใกล้กัน ระวัง Short Circuit
- Component ขนาด 0402 เล็กมาก ต้องใช้ Tweezers และแว่นขยาย
- ใช้ Flux ช่วยให้ตะกั่วไหลดีขึ้น
- อย่าให้ความร้อนนานเกินไป Component อาจเสียหาย
- ตรวจสอบ Polarity ของ LED และ Capacitor
หลังจากบัดกรีเสร็จ ต้องทดสอบวงจร:
- Visual Inspection - ดูด้วยตาว่ามี Short หรือ Cold Joint หรือไม่
- Continuity Test - ใช้ Multimeter ตรวจสอบ Short Circuit
- Power Test - เสียบ USB ดูว่า 3.3V ออกมาหรือไม่
- LED Test - ทดสอบ LED ทีละดวง
- Programming Test - ลอง Flash Firmware ดู
นามบัตรเสียบเข้า USB Port พร้อมใช้งาน
Programming & Demo
หลังจากประกอบเสร็จ ต้อง Flash Firmware ลงไปใน RP2040
ใช้ Pico SDK สำหรับเขียนโปรแกรม:
- Pico SDK - Official SDK จาก Raspberry Pi
- CMake - Build System
- GCC ARM - Compiler
- TensorFlow Lite Micro - ML Framework
- VS Code - IDE
ตัวอย่างการใช้งาน:
🗣️ Speech Detection
พูดเข้าไปที่นามบัตร LED จะสว่างแสดงว่าตรวจจับเสียงพูดได้
👏 Clap Detection
ปรบมือ LED จะกระพริบแสดงว่าตรวจจับเสียงปรบมือได้
🎵 Music Detection
เปิดเพลง LED จะเต้นตามจังหวะเพลง
🔇 Silence Detection
เงียบ LED จะดับหรือสว่างเบาๆ
วิธี Flash Firmware ลง RP2040:
- Build Firmware - Compile โปรแกรมเป็นไฟล์ .uf2
- Enter Bootloader Mode - กด BOOTSEL Button แล้วเสียบ USB
- Copy UF2 File - Copy ไฟล์ .uf2 ไปยัง RPI-RP2 Drive
- Auto Reboot - RP2040 จะ Reboot และรันโปรแกรมอัตโนมัติ
💡 Tips สำหรับ Demo:
- ✅ ทดสอบในที่เงียบก่อน เพื่อให้ Model ทำงานได้ดี
- ✅ ใช้ LED Pattern ที่สวยงามและเข้าใจง่าย
- ✅ เพิ่ม Serial Output เพื่อ Debug
- ✅ ทำ Calibration สำหรับ Microphone Gain
- ✅ เพิ่ม Smoothing เพื่อลด Jitter ของผลลัพธ์
Applications และการประยุกต์ใช้
นอกจากใช้เป็นนามบัตรแล้ว ยังสามารถประยุกต์ใช้ในหลายด้าน:
- Portfolio Demo - แสดงความสามารถด้าน Embedded AI
- Job Interview - นำไปสัมภาษณ์งานเป็น Portfolio
- Conference Badge - ใช้ในงาน Conference แทนนามบัตรธรรมดา
- Tech Demo - Demo ให้ลูกค้าหรือนักลงทุน
- TinyML Workshop - สอน Machine Learning บน Microcontroller
- PCB Design Course - สอนการออกแบบ PCB
- Embedded Systems - โปรเจคสำหรับนักศึกษา
- Audio Processing - สอน DSP และ Audio Classification
- Edge AI Research - วิจัย ML บนอุปกรณ์ขนาดเล็ก
- Audio Analysis - วิจัยการวิเคราะห์เสียง
- Low-power ML - วิจัย ML ที่ประหยัดพลังงาน
- Sensor Fusion - รวม Audio กับ Sensor อื่นๆ
- Interactive Art - ศิลปะที่ตอบสนองต่อเสียง
- Music Visualizer - แสดงผล LED ตามเพลง
- Sound-reactive Wearable - อุปกรณ์สวมใส่ที่ตอบสนองเสียง
- Smart Badge - Badge อัจฉริยะสำหรับงานอีเวนต์
🎙️ Voice Command
เพิ่ม Keyword Spotting เพื่อรับคำสั่งเสียง เช่น "Hey Card"
📱 Bluetooth
เพิ่ม BLE เชื่อมต่อกับมือถือ ส่งข้อมูลแบบ Wireless
🔋 Battery Powered
เพิ่มแบตเตอรี่ขนาดเล็ก ทำงานได้โดยไม่ต้องเสียบ USB
📊 Data Logging
บันทึกข้อมูลเสียงลง Flash เพื่อวิเคราะห์ภายหลัง
🌐 IoT Integration
เชื่อมต่อกับ IoT Platform ส่งข้อมูลไป Cloud
🎮 Game Controller
ใช้เสียงควบคุมเกม เช่น เป่าเพื่อกระโดด
🎯 ทำไมต้องทำโปรเจคนี้?
- ✅ Unique - นามบัตรที่ไม่เหมือนใคร
- ✅ Impressive - สร้างความประทับใจได้ทันที
- ✅ Educational - เรียนรู้ได้หลายอย่าง (PCB, ML, Embedded)
- ✅ Portfolio - เป็น Portfolio ที่แข็งแกร่ง
- ✅ Conversation Starter - เป็นหัวข้อคุยที่น่าสนใจ
💰 ประมาณการค่าใช้จ่าย
- PCB Manufacturing: ~$50-100 (10 pieces)
- Components: ~$10-15 per card
- Assembly: DIY หรือ ~$20-30 per card
- Total per card: ~$15-25 (DIY) หรือ ~$35-45 (Assembly Service)
* ราคาถูกลงถ้าสั่งจำนวนมาก
ช้อปอุปกรณ์ / เข้าร่วม Community
หากคุณสนใจอุปกรณ์สำหรับโปรเจค ML Business Card เช่น RP2040 Board, MEMS Microphone, PCB Manufacturing หรืออยากพูดคุยแลกเปลี่ยนความรู้เกี่ยวกับ TinyML และ PCB Design สามารถกดปุ่มด้านล่างนี้ได้เลย


