
Arduino Water Level Sensor: อ่านระดับน้ำด้วย Analog A0
Arduino จะรู้ได้ยังไงว่าน้ำอยู่ระดับ Empty, Low, Medium หรือ High? โปรเจกต์นี้ใช้ Water Level Sensor Board เพียงหนึ่งตัว ต่อ Signal เข้าขา Analog A0 ของ Arduino UNO แล้วใช้ค่าจาก analogRead() แบ่งออกเป็น 4 ระดับด้วย if / else if
แม้ Project จะดูง่าย แต่มันสอนได้ครบทั้ง Analog Input, ADC Reading, Threshold, Serial Monitor และ Serial Plotter ซึ่งเป็นพื้นฐานสำคัญก่อนต่อยอดไปยัง Sensor Project ที่ซับซ้อนขึ้น
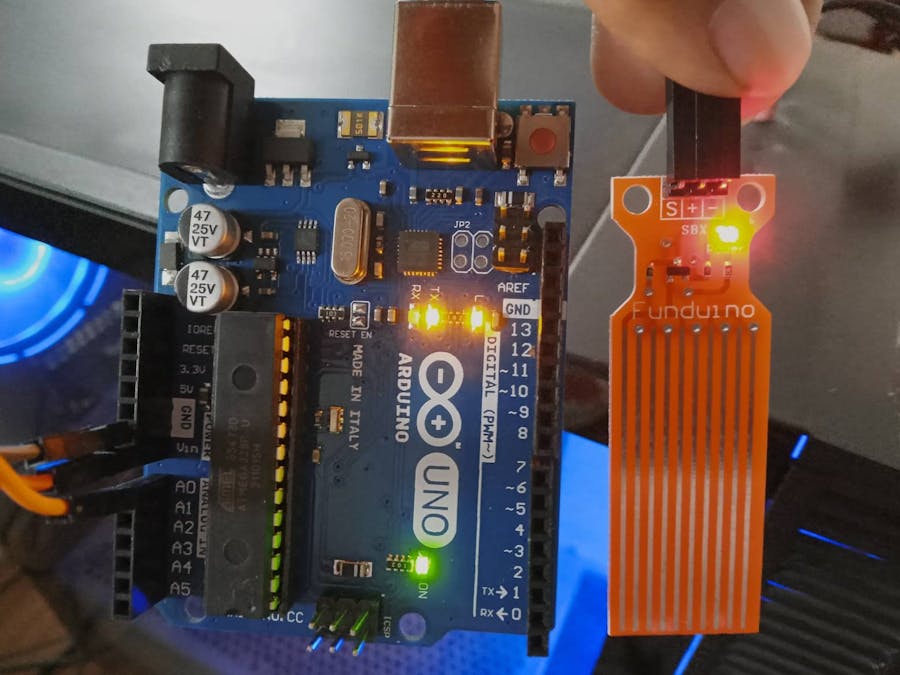
- ใช้ Arduino UNO R3 และ Water Level Sensor Board
- Sensor Signal ต่อเข้าขา A0
- Source ระบุ Sensor Operating Voltage DC 3–5V
- Source ระบุ Operating Current ต่ำกว่า 20mA
- Code ใช้ analogRead(A0) เพื่ออ่าน Raw Analog Value
- แบ่งสถานะเป็น Empty, Low, Medium และ High
- Threshold ที่ใช้คือ 100, 400 และ 450 ตาม Project ต้นฉบับ
- Threshold เหล่านี้เป็น Raw ADC Values ไม่ใช่ความสูงของน้ำเป็น cm หรือ mm
- Code Classification ส่งผลผ่าน Serial Monitor ทุก 1 วินาที
- Code อีกชุดส่ง Raw Value ไป Serial Plotter ทุก 3 วินาที
Water Level Sensor Project นี้คืออะไร?
Project ของ Sheekar Banerjee ใช้ Water Level Sensor Board เป็น Analog Input ให้ Arduino UNO R3
Arduino อ่านค่าจาก Sensor แล้วใช้ Threshold ง่าย ๆ เพื่อจัด Raw Reading ให้เป็นสถานะที่คนอ่านเข้าใจง่าย:
- Empty
- Low
- Medium
- High
สร้าง Analog Signal
รับ Analog Input
ได้ Raw ADC Value
Empty / Low / Medium / High
แสดงสถานะให้ผู้ใช้ดู
Hardware ที่ใช้มีอะไรบ้าง?
| Hardware / Software | ข้อมูลจาก Source |
|---|---|
| Arduino UNO | Controller หลักของ Project |
| Water Level Sensor Board Arduino | Analog Water Level Sensor |
| Sensor Operating Voltage | DC 3–5V |
| Sensor Operating Current | น้อยกว่า 20mA ตาม Source |
| Arduino IDE | ใช้สำหรับเขียนและ Upload Code |
Source ไม่ได้ระบุ Manufacturer, Model Number, Sensor Length, Measurement Range หรือ Accuracy ของ Sensor Board เพิ่มเติม
Sensor ส่งข้อมูลเข้า Arduino ยังไง?
Signal Pin ของ Sensor ถูกต่อเข้ากับ A0 ซึ่งเป็น Analog Input ของ Arduino UNO
Firmware ใช้:
analogRead(A0)
เพื่ออ่านค่าจาก Sensor ก่อนนำ Raw Reading ไปเปรียบเทียบกับ Threshold
analogRead() ได้ค่าอะไร?
Arduino UNO อ่าน Analog Input แล้วแปลงเป็นค่าดิจิทัลที่ Code นำไปประมวลผลได้
ในการใช้งานแบบ Default ของ Arduino UNO analogRead() ให้ Raw Reading อยู่ในช่วง 0–1023
Code ใน Project จึงนำค่าตัวเลขนี้ ไปเทียบกับ 100, 400 และ 450 เพื่อแบ่งระดับน้ำ
Source ต่อ Sensor กับ Arduino อย่างไร?
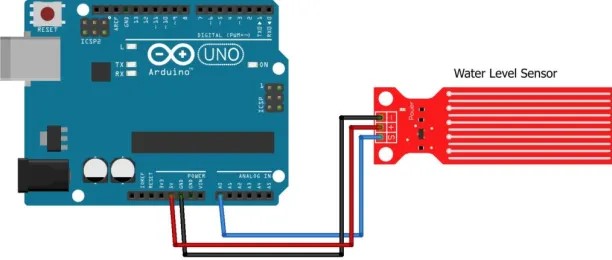
| Arduino UNO | Water Level Sensor |
|---|---|
| Vin | + |
| GND | - |
| A0 | S |
ตารางข้างต้นคือ Wiring ตามที่ Source ต้นฉบับระบุ ไม่ใช่การแก้ไขหรือออกแบบ Wiring ใหม่
ระวัง: Vin → + ใน Source มีปัญหาตรงไหน?
จุดนี้สำคัญเพราะคำว่า VIN ไม่ได้หมายถึง regulated 5V output ของ Arduino UNO
บทความนี้จึงไม่เปลี่ยน Wiring ของผู้สร้างเงียบ ๆ และไม่สร้าง Power Wiring ใหม่ขึ้นเอง แต่แนะนำให้ใช้ Official Arduino UNO Pinout และตรวจแรงดันของ Sensor Board จริงก่อนต่อ
แบ่ง Empty / Low / Medium / High อย่างไร?
Code ของผู้สร้างใช้ if / else if เพื่อแบ่ง Raw Reading ดังนี้
| Raw Analog Reading | สถานะใน Code |
|---|---|
| value ≤ 100 | Empty |
| 100 < value ≤ 400 | Low |
| 400 < value ≤ 450 | Medium |
| value > 450 | High |
100 / 400 / 450 คือความสูงของน้ำหรือไม่?
ไม่ใช่
ตัวเลขเหล่านี้คือ Raw Analog Threshold ที่ผู้สร้างเลือกใช้กับ Sensor และ Setup ของตัวเอง
Source ไม่ได้บอกว่า:
- 100 เท่ากับน้ำลึกกี่ mm
- 400 เท่ากับกี่ cm
- 450 เท่ากับกี่เปอร์เซ็นต์ของถัง
- Sensor จุ่มลงน้ำลึกเท่าไรตอน Calibration
Arduino Code ชุดที่ 1: แบ่ง Water Level เป็น 4 ระดับ
Code ชุดแรกอ่าน A0 ทุกประมาณ 1 วินาที แล้วแสดงข้อความ Empty, Low, Medium หรือ High ผ่าน Serial Monitor
//Coded and Tested By:
//Sheekar Banerjee, AI-ML-IOT Solution Engineer and Researcher
int value = 0;  // holds the value
int data = A0; // sensor data pin used

void setup() {
    pinMode(data, INPUT);
    Serial.begin(9600); //start the serial console
}

void loop() {
    value = analogRead(data);

    if (value<=100)
    {
        Serial.println("Water Level: Empty");
    }
    else if (value>100 && value<=400)
    {
        Serial.println("Water Level: Low");
    }
    else if (value>400 && value<=450)
    {
        Serial.println("Water Level: Medium");
    }
    else if (value>450)
    {
        Serial.println("Water Level: High");
    }

    delay(1000);
}
ดูผลผ่าน Serial Monitor

Code ใช้ Serial Communication ที่:
9600 baud
ผลที่ผู้ใช้เห็นจึงไม่ใช่ Raw Value แต่เป็นข้อความ เช่น:
- Water Level: Empty
- Water Level: Low
- Water Level: Medium
- Water Level: High
Arduino Code ชุดที่ 2: ส่ง Raw Analog Value
Code ชุดที่สองตัด Threshold Logic ออก และพิมพ์ Raw Reading จาก Sensor โดยตรง
วิธีนี้เหมาะกับการดูว่า Signal เปลี่ยนขึ้นลงอย่างไร ก่อนตัดสินใจว่าจะตั้ง Threshold ตรงไหน
//Coded and Tested By:
//Sheekar Banerjee, AI-ML-IOT Solution Engineer and Researcher
const int sensorPin= A0; //sensor pin connected to analog pin A0
int liquid_level;

void setup() {
    Serial.begin(9600); //baud rate for data transfer in bits per second
    pinMode(sensorPin, INPUT);//the liquid level sensor will be an input
}

void loop() {
    liquid_level= analogRead(sensorPin); //arduino reads the value
    Serial.println(liquid_level);//prints out liquid level sensor reading
    delay(3000);//delays 3 Seconds
}
Serial Plotter ช่วยอะไร?

Serial Monitor กับ Serial Plotter จึงตอบโจทย์คนละแบบ
| Tool | ข้อมูลที่ Code ส่ง | เหมาะกับ |
|---|---|---|
| Serial Monitor | Empty / Low / Medium / High | ดู State ที่ตีความแล้ว |
| Serial Plotter | Raw Analog Reading | ดูการเปลี่ยนแปลงของ Signal ตามเวลา |
ทำไม Code แรก Delay 1 วินาที แต่ Plotter Delay 3 วินาที?
เพราะ Source กำหนดไว้ต่างกันใน Code แต่ละชุด
| Code | Delay |
|---|---|
| Water Level Classification | 1000 ms |
| Raw Reading / Serial Plotter | 3000 ms |
Source ไม่ได้อธิบายเหตุผลเพิ่มเติม ว่าทำไมผู้สร้างเลือก Sampling Interval สองค่านี้ ดังนั้นบทความจะไม่สร้างเหตุผลทาง Technical เพิ่มเอง
Threshold ชุดนี้ใช้กับ Sensor ทุกตัวได้ไหม?
Source ไม่ได้ยืนยันว่าใช้ได้กับ Sensor ทุกตัว
Threshold:
- 100
- 400
- 450
เป็นค่าที่อยู่ใน Code ของ Project นี้ แต่ไม่มี Calibration Procedure ที่บอกว่าจะนำ Threshold ชุดเดียวกัน ไปใช้กับ Module, น้ำ หรือ Setup อื่นได้อย่างไร
Source ยังไม่ได้ระบุ:
- Sensor Manufacturing Variation
- Water Conductivity
- Immersion Depth
- Sensor Orientation
- Environmental Conditions
- Calibration Reference
Project นี้วัด Depth เป็น cm ได้ไหม?
จาก Code และ Source ที่ให้มา ยังไม่ได้
Project แบ่ง Raw Analog Reading เป็น State เท่านั้น และไม่มี Equation สำหรับแปลง ADC Value ไปเป็นระยะทางจริง
Source ไม่ได้ให้:
- Calibration Point
- Sensor Active Length
- mm / ADC Conversion
- cm / ADC Conversion
- Tank Geometry
- Volume Formula
สิ่งที่ Source ไม่ได้ทำคือ Precision Depth Measurement หรือ Volume Measurement
Maker ได้อะไรจาก Project นี้?
1. Analog Sensor ไม่ได้ส่งคำตอบสำเร็จรูป
Arduino ได้ Raw Value แล้ว Code เป็นคนแปลความหมาย ว่าค่าช่วงใดคือ Low หรือ High
2. Threshold คือส่วนหนึ่งของ Application Logic
`if / else if` ทำหน้าที่เปลี่ยน Data ต่อเนื่อง ให้กลายเป็น State ที่นำไปใช้ง่าย
3. Raw Data สำคัญก่อน Calibration
Serial Plotter ช่วยให้เห็น Signal จริง ก่อนตัดสินใจตั้ง Threshold
4. ค่า ADC ไม่ใช่หน่วยทางกายภาพโดยอัตโนมัติ
450 ไม่ได้แปลว่า 450 mm จนกว่าจะมี Calibration ที่พิสูจน์ความสัมพันธ์นั้น
5. Wiring จาก Community Project ก็ควรตรวจ Official Docs
จุด `Vin → +` ใน Source เป็นตัวอย่างที่ดีว่า Circuit Diagram จาก Project Community ไม่ควรถูก Copy โดยไม่ตรวจ Pin Function ของ Development Board ก่อน
6. Serial Monitor และ Plotter ใช้ Debug คนละมุม
Monitor เหมาะกับข้อความและ State ขณะที่ Plotter เหมาะกับการมอง Trend ของ Sensor Data
โปรเจกต์นี้มีหลายขั้น แนะนำอ่านต้นฉบับควบคู่กัน
โดยเฉพาะ Wiring Power ควรเปิด Official Arduino UNO R3 Documentation ควบคู่กับ Project ต้นฉบับ ก่อนต่อ Sensor จริง
FAQ: คำถามที่พบบ่อย
1. Project นี้ใช้ Arduino รุ่นอะไร?
Source ใช้ Arduino UNO R3
2. Sensor ต่อ Signal เข้าขาไหน?
Source ต่อขา S ของ Water Level Sensor เข้ากับ Analog Input A0
3. Water Level Sensor ใช้แรงดันเท่าไร?
Source ระบุ Operating Voltage DC 3–5V
4. Sensor กินกระแสเท่าไร?
Source ระบุ Operating Current ต่ำกว่า 20mA
5. Source ต่อขา + ของ Sensor กับอะไร?
Source ระบุ Vin → + แต่ Official Arduino UNO Documentation ระบุ VIN เป็น Voltage Input จึงไม่ควรคัดลอก Wiring จุดนี้ โดยไม่ตรวจ Power Configuration ก่อน
6. analogRead(A0) อ่านค่าอะไร?
เป็น Raw Analog-to-Digital Reading ซึ่งบน Arduino UNO แบบ Default อยู่ในช่วง 0–1023
7. ค่า 100 หมายถึงน้ำสูง 100 mm หรือไม่?
ไม่ Source ใช้ 100 เป็น Raw ADC Threshold และไม่ได้ให้หน่วย mm หรือ cm
8. Empty ใช้ Threshold เท่าไร?
Code ใช้ value ≤ 100
9. Low ใช้ Threshold เท่าไร?
Code ใช้ค่ามากกว่า 100 และไม่เกิน 400
10. Medium ใช้ Threshold เท่าไร?
Code ใช้ค่ามากกว่า 400 และไม่เกิน 450
11. High เริ่มจากค่าเท่าไร?
Code ใช้ value > 450
12. Threshold นี้ใช้กับ Water Level Sensor ทุกตัวได้ไหม?
Source ไม่ได้ระบุว่าเป็น Universal Threshold จึงควรมองเป็นค่าที่ใช้ใน Project นี้
13. Serial Monitor ใช้ Baud Rate เท่าไร?
Code ทั้งสองชุดใช้ 9600 baud
14. Code อ่าน Sensor บ่อยแค่ไหน?
Classification Code มี delay 1000 ms ส่วน Serial Plotter Code มี delay 3000 ms
15. ใช้ Serial Plotter ทำอะไร?
ใช้ดูแนวโน้มของ Raw Analog Reading จาก Sensor ตามเวลา
16. Project นี้วัดน้ำเป็น cm ได้ไหม?
Source ไม่มี Calibration Formula สำหรับแปลง ADC Reading เป็น cm หรือ mm จึงยังทำไม่ได้จากข้อมูลที่ให้มา
17. วัดปริมาตรน้ำเป็นลิตรได้ไหม?
Source ไม่ได้ให้ Tank Geometry หรือ Calibration สำหรับคำนวณ Volume
18. Source ระบุ Accuracy ของ Sensor ไหม?
ไม่ Source ไม่ได้ระบุ Accuracy, Precision หรือ Calibration Specification
References / แหล่งข้อมูลต้นฉบับ
เริ่ม Analog Sensor Project จากค่า Raw ก่อน
Water Level Sensor Project นี้เป็นตัวอย่างง่าย ๆ ที่ช่วยให้เข้าใจว่า Arduino อ่าน Analog Signal อย่างไร และเราสามารถเปลี่ยน Raw Reading ให้เป็น State ที่นำไปใช้งานต่อได้อย่างไร
หากกำลังเริ่มทดลอง Arduino, Analog Sensor หรือ Monitoring Project สามารถสอบถามทีม Globalbyte เรื่อง Development Board, Sensor, Module, Jumper Wire และ Maker Accessories ที่เหมาะกับ Project ได้


