
เขียน Bluetooth Printer Driver จาก Python สู่ ESP32-C3
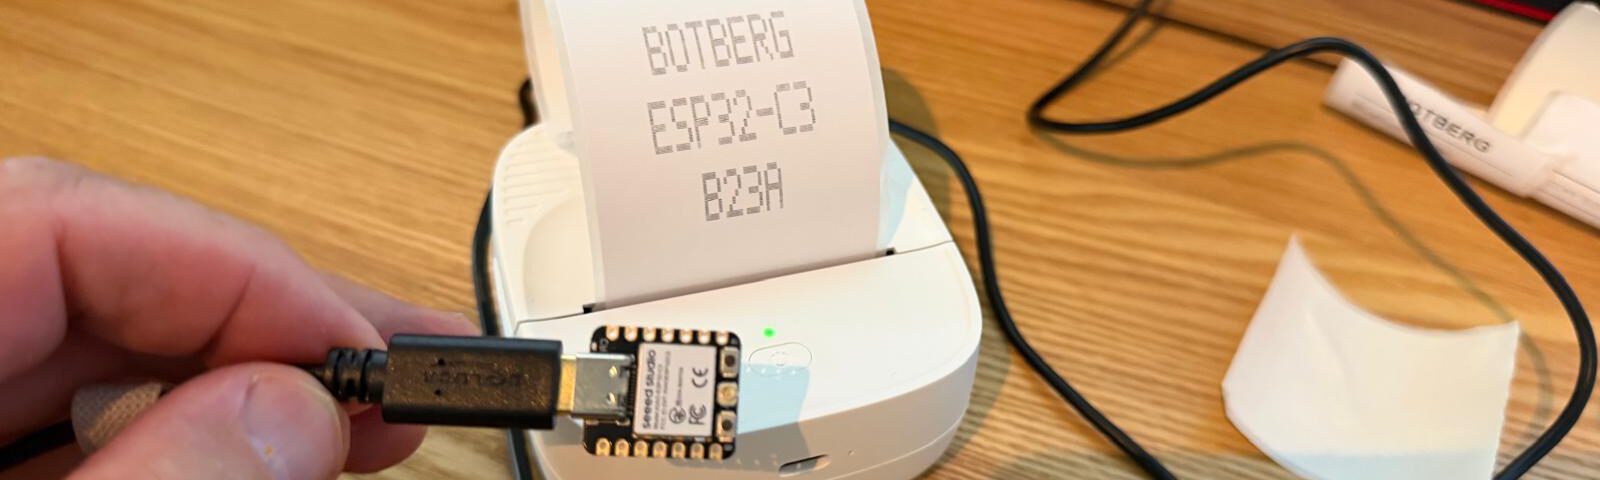
เครื่องพิมพ์ Thermal ตัวเล็กที่ปกติต้องใช้ App บนมือถือ จะเกิดอะไรขึ้นถ้าตัด App ออกจากระบบทั้งหมด แล้วสร้าง Driver ของเราเอง? โปรเจกต์นี้เริ่มจากแกะ Pocket Printer, สำรวจ Bluetooth Low Energy, ทดลอง Protocol ด้วย Python แล้วค่อย Port Logic ทั้งหมดไปยัง ESP32-C3 จน Printer ทำงานได้โดยไม่ต้องมี Laptop อยู่ใน Runtime Chain
จุดน่าสนใจไม่ได้อยู่แค่คำว่า “ESP32 พิมพ์กระดาษได้” แต่คือกระบวนการที่ผู้สร้างค่อย ๆ เปลี่ยนเครื่องพิมพ์ที่ไม่มี SDK ให้กลายเป็น Embedded Output Device ด้วยการทำความเข้าใจ BLE Service, Characteristic, Raster Data และ Flow Control ทีละชั้น
แนวคิดหลักของ Project: พิสูจน์ Protocol บน Python ให้เข้าใจก่อน แล้วค่อยย้าย Logic ที่พิสูจน์แล้ว เข้า C++ บน ESP32-C3 — หรือพูดสั้น ๆ ว่า “Prove the protocol first, embed it later.”
Key Takeaways
- อุปกรณ์ต้นทางคือ B23a / Hi.22.052 Pocket Printer ตาม Source
- Printer ปกติถูกควบคุมด้วย AiYin App บนมือถือ
- เครื่องตัวอย่าง Advertise เป็น
B23a_7F36_BLE - Firmware ที่ Creator เห็นใน App คือ V2.0.4
- BLE MAC
CC:99:17:57:7F:36เป็นของเครื่องตัวอย่าง ไม่ใช่ Universal Address - Service ที่ Driver ใช้คือ FF00
- FF02 ใช้ส่งข้อมูลไป Printer
- FF03 ใช้รับ Notification จาก Printer
- Notification
01 01ถูกใช้เป็น Ready Signal ใน Driver นี้ - Python Version ใช้ Bleak สำหรับ BLE
- Print Head กว้าง 384 pixels หรือ 48 bytes ต่อ Raster Row
- Raster Command ที่ Source ใช้เริ่มด้วย
1D 76 30 00 - การส่ง Raster Data เร็วเกินไปทำให้เกิด Incomplete Print
- ESP32-C3 Version แบ่งข้อมูลเป็น Chunk สูงสุด 120 bytes
- Driver ใช้ Timeout 150 ms ขณะรอ Ready Notification
- 120 bytes เป็น Implementation Choice ไม่ใช่ BLE MTU ที่ Source ยืนยัน
- ESP32-C3 ใช้ NimBLE-Arduino, Adafruit GFX และ qrcode.h
- Receipt ถูก Render เป็น 1-bit Canvas บน ESP32-C3 เอง
- หนึ่ง Raster Strip สูง 32 pixels = 1536 bytes ก่อนรวม Header
- Final Predictive Maintenance Receipt เป็น Sample Application ไม่ใช่ระบบ Anomaly Detection ที่ Validate แบบ End-to-end
Project นี้คืออะไร?
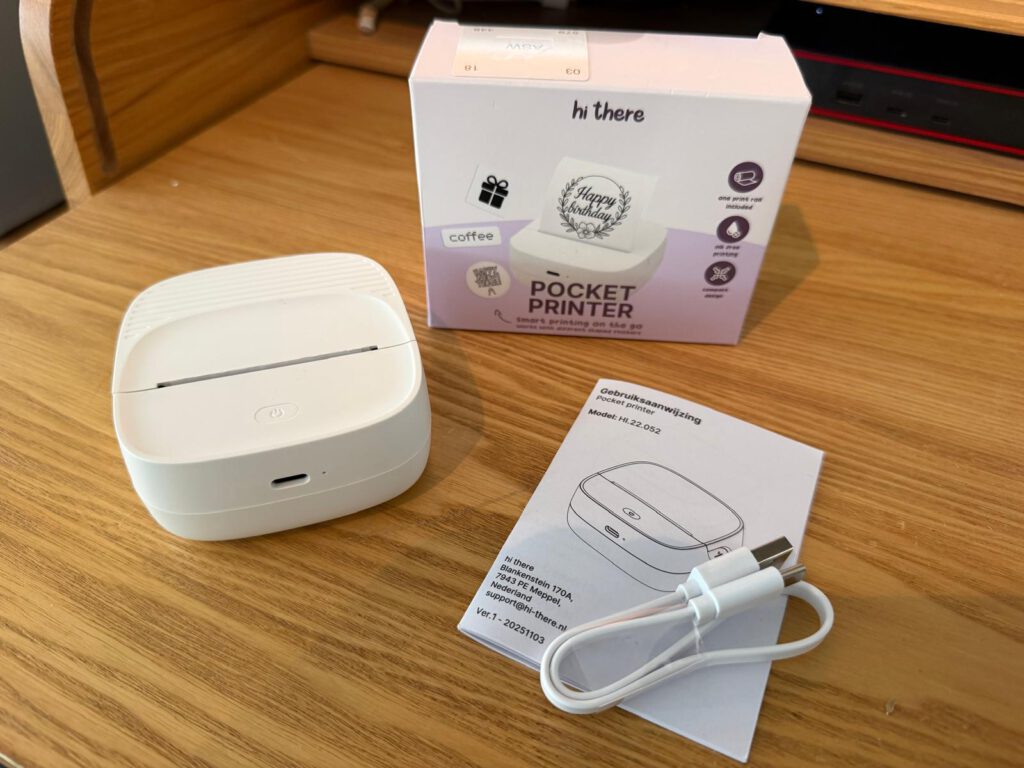
Project เริ่มจากคำถามง่าย ๆ:
ถ้าไม่ใช้ App เดิมเลย เราสามารถคุยกับ Printer โดยตรงได้ไหม?
ผู้สร้างจึงแบ่งงานออกเป็นสอง Phase อย่างตั้งใจ
Phase 1 — Python บน Laptop
ใช้เป็น Environment สำหรับ:
- ทดลอง BLE Connection
- สำรวจ Service และ Characteristic
- เปลี่ยน Byte แล้วทดสอบซ้ำได้เร็ว
- ดูว่า Printer ตอบสนองอย่างไร
- ทดลองส่ง Raster Data
- หา Flow Control ที่เสถียร
Phase 2 — C++ บน ESP32-C3
เมื่อ Driver บน Laptop ทำงานได้แล้ว Logic เดิมจึงถูก Port เข้า Microcontroller เพื่อให้ระบบทำงานได้เอง
Laptop + Python + Bleak
↓
เข้าใจ BLE / Commands / Flow Control
ระยะ Embedded
ESP32-C3 + C++ + NimBLE
↓
Printer ทำงานโดยไม่ต้องมี Laptop
เริ่มจากแกะ Pocket Printer ดูว่า Hardware ข้างในมีอะไร
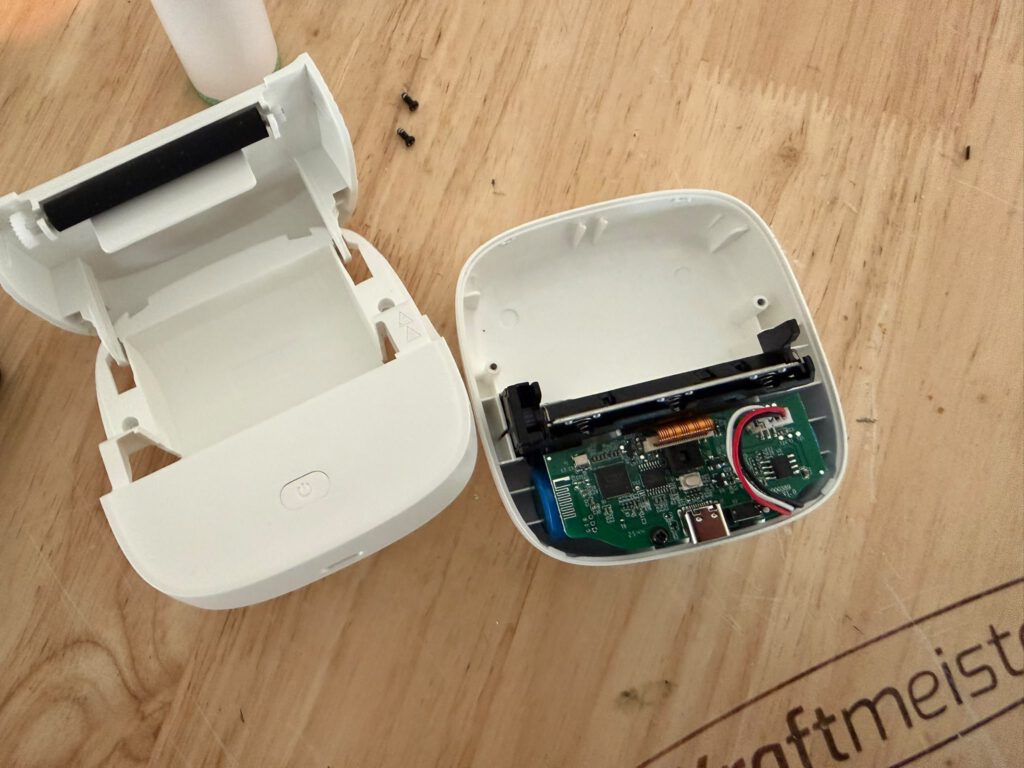
การ Reverse Engineer เริ่มจาก Hardware เพื่อเข้าใจว่าอุปกรณ์สร้างขึ้นอย่างไร ก่อนจะไปดู Protocol
Source ระบุชิ้นส่วนที่เห็นได้ เช่น:
- Thermal Print Head
- Paper Transport พร้อม Motor ขนาดเล็ก
- 3.7V Li-ion Battery
- Compact Control PCB
- Flex Connection ระหว่าง Mechanism กับ Electronics
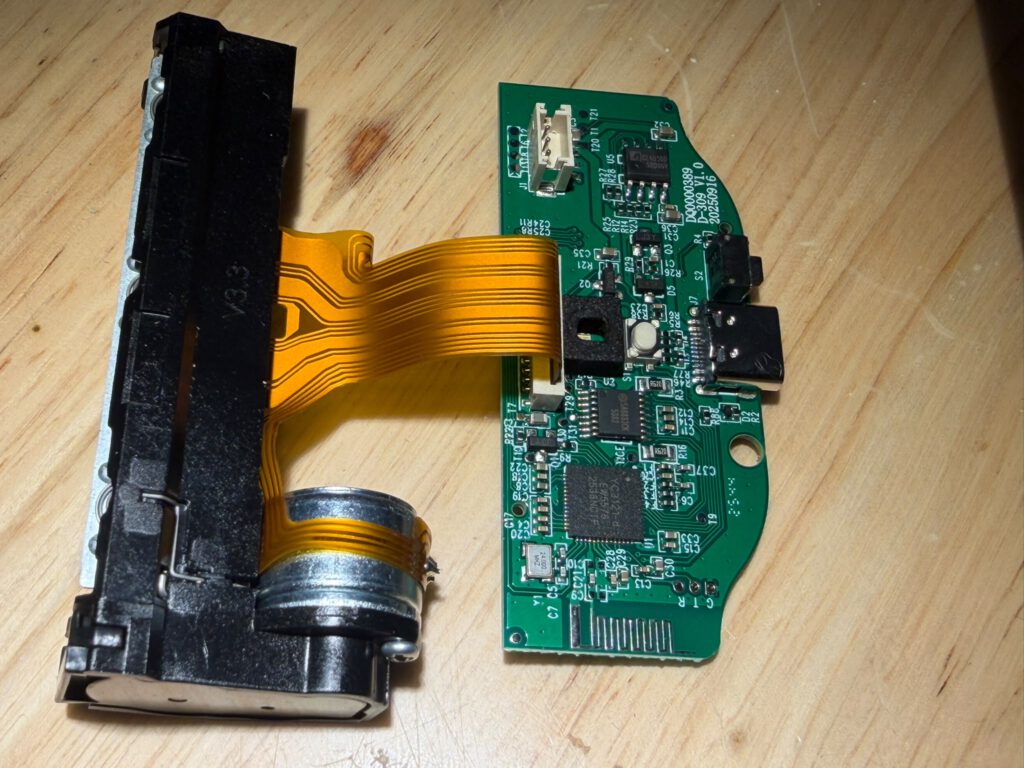
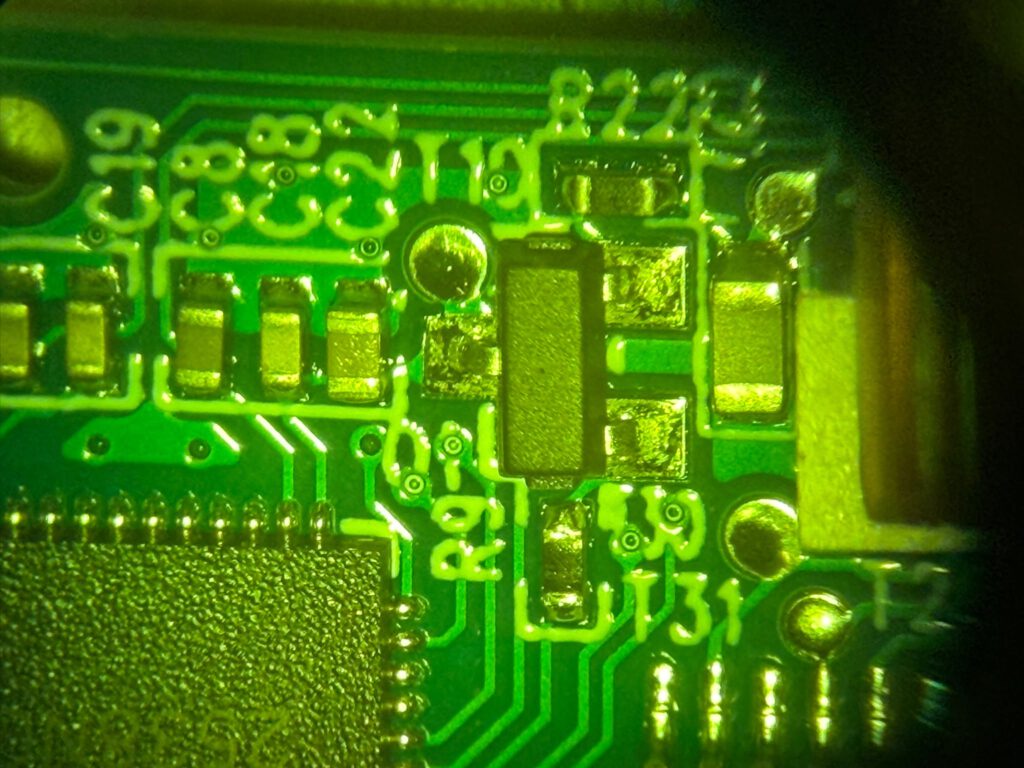
Source ไม่ได้ให้ Electrical Specification ภายในครบ: ไม่มี Battery Capacity, Battery Runtime, Motor Voltage, Thermal Head Voltage, Charging Current หรือ Current Consumption จึงไม่ควรสร้างค่าพวกนี้เพิ่มเอง
Li-ion Battery Safety: การเปิดเครื่องพิมพ์จริง ควรระวังไม่ให้เครื่องมือโลหะ Short ขั้ว Battery, บีบ, เจาะ หรือทำ Cell เสียหาย และบทความนี้ไม่ได้ให้ขั้นตอนซ่อม หรือดัดแปลง Battery Pack
เมื่อไม่มี SDK — App และ BLE กลายเป็น Documentation
Creator ระบุว่า ไม่มี Official SDK หรือ Protocol Documentation ที่ใช้งานได้
สิ่งที่ใช้แทน Documentation คือ:
- AiYin App เดิม
- ข้อมูลจาก Printer ตัวจริง
- Bluetooth Communication
- nRF BLE Browser
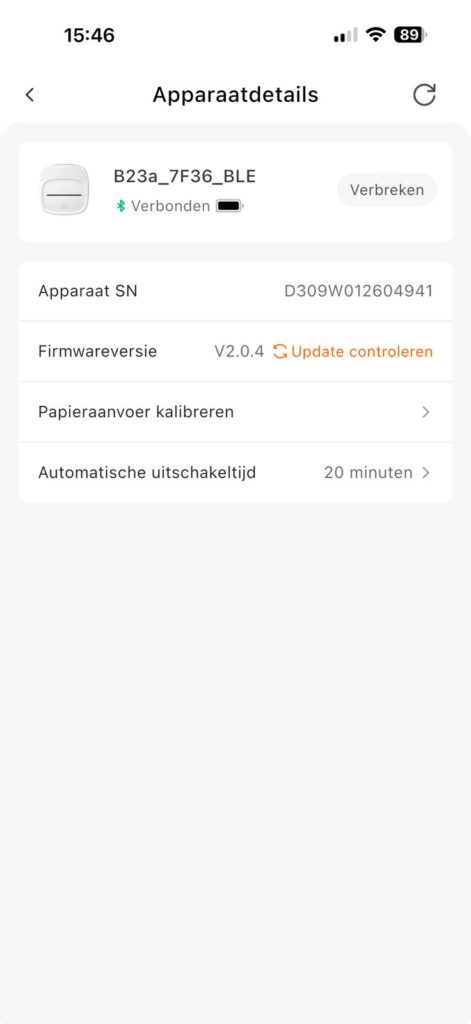
ข้อมูล BLE ที่ Creator พบในเครื่องตัวอย่าง
| รายการ | ค่าที่ Source ระบุ |
|---|---|
| Advertised Name | B23a_7F36_BLE |
| Firmware ที่เห็นใน App | V2.0.4 |
| BLE MAC ของ Unit ตัวอย่าง | CC:99:17:57:7F:36 |
MAC Address นี้เป็นของ Printer ตัวอย่างของ Creator: ห้าม Copy CC:99:17:57:7F:36 แล้วคาดหวังว่าจะใช้กับ Printer เครื่องอื่นได้
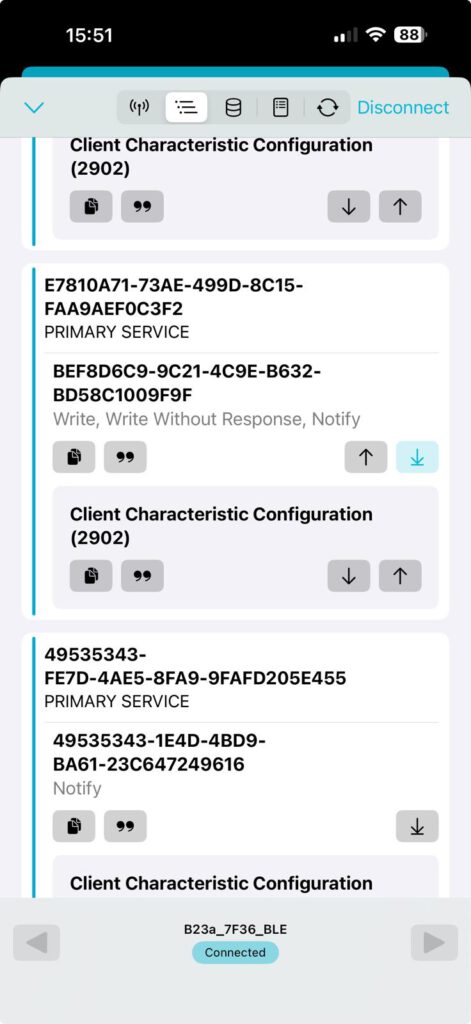
FF00 / FF02 / FF03 ทำหน้าที่อะไรใน Driver นี้?
หลังสำรวจ GATT Structure Creator ใช้ Service:
0000ff00-0000-1000-8000-00805f9b34fb
| GATT Item | UUID | หน้าที่ใน Driver |
|---|---|---|
| FF00 | 0000ff00-0000-1000-8000-00805f9b34fb |
Service ที่ใช้ใน Project |
| FF02 | 0000ff02-0000-1000-8000-00805f9b34fb |
ส่ง Data ไปยัง Printer |
| FF03 | 0000ff03-0000-1000-8000-00805f9b34fb |
รับ Notifications จาก Printer |
Notification ที่กลายเป็นหัวใจของ Flow Control คือ:
01 01
Driver ของ Creator ใช้ Notification นี้ เป็น Signal ว่าสามารถเดินหน้าส่งข้อมูลชุดต่อไปได้
นี่คือพฤติกรรมที่พบกับ Printer / Firmware ที่ Creator ทดสอบ: Source ไม่ได้ยืนยันว่า FF00, FF02, FF03 หรือ Notification 01 01 เป็น Protocol เดียวกันสำหรับ Pocket Printer ทุกรุ่น หรือ Firmware Revision อื่น
Driver ตัวแรกเขียนด้วย Python และ Bleak
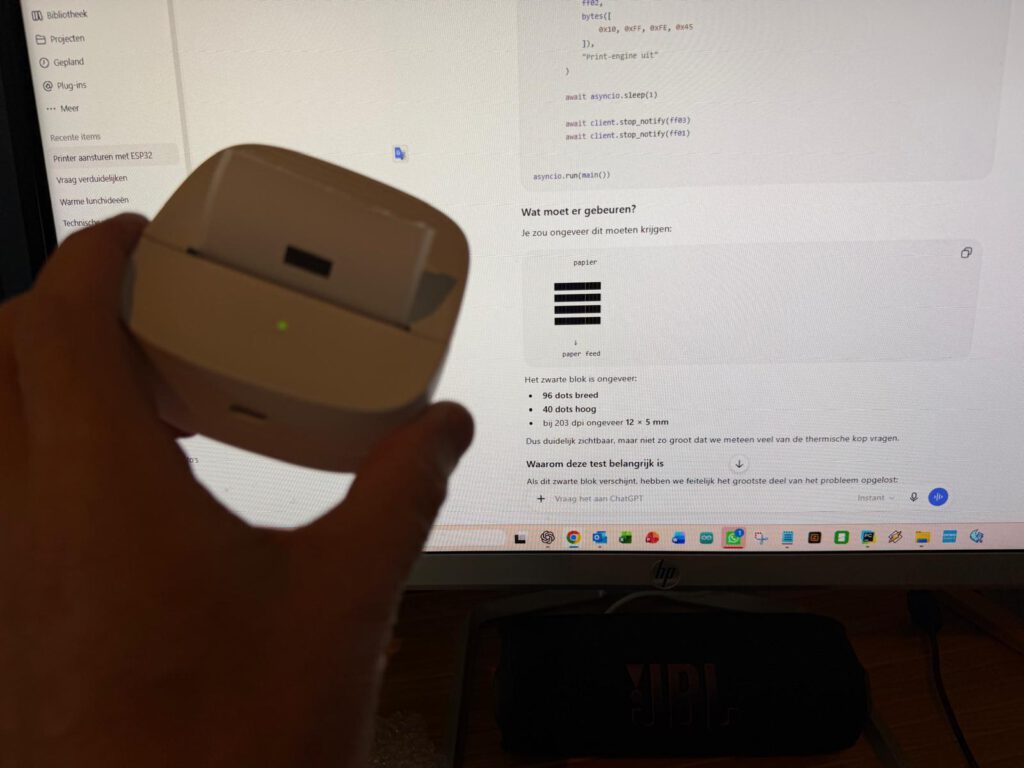
Python เหมาะกับช่วง Reverse Engineering เพราะสามารถเปลี่ยน Logic แล้วลองใหม่ได้เร็ว
Library ที่ Source ใช้คือ:
Bleak
import asyncio
from bleak import BleakClient

PRINTER = "CC:99:17:57:7F:36"

FF02 = "0000ff02-0000-1000-8000-00805f9b34fb"
FF03 = "0000ff03-0000-1000-8000-00805f9b34fb"

ready = asyncio.Event()

def notification_handler(sender, data):
    if data == bytes([0x01, 0x01]):
        ready.set()

async def send(client, data):
    ready.clear()

    await client.write_gatt_char(
        FF02, data, response=False
    )

    try:
        await asyncio.wait_for(
            ready.wait(), timeout=0.15
        )
    except asyncio.TimeoutError:
        pass
PRINTER ในตัวอย่างคือ MAC ของ Unit ของ Creator: เครื่องอื่นต้องใช้ Address ที่ตรงกับ Printer ของตัวเอง
Milestone แรก: Motor ขยับจาก Code ของเราเอง
Source เล่าว่า Moment สำคัญช่วงต้น ไม่ใช่การพิมพ์ Receipt สวย ๆ แต่เป็นตอนที่ Motor เริ่มหมุนจาก Python Code ของ Creator เอง
↓
BLE
↓
Printer Command
↓
Paper Movement
จาก Printer Command ไปสู่ Pixels
เมื่อ Connection และ Basic Command ทำงานได้แล้ว ขั้นต่อไปคือการพิมพ์ Graphic
Source ระบุว่า Thermal Head กว้าง:
384 pixels
เพราะหนึ่ง Pixel ใช้หนึ่ง Bit:
÷ 8 bits ต่อ byte
=
48 bytes ต่อ Horizontal Row
Raster Data Command ที่ Creator ใช้เริ่มด้วย:
1D 76 30 00หลัง Header จะมีข้อมูล Width, Height และ Bitmap ตามที่ Source อธิบาย
Source ไม่ได้แจก Full Raster Packet Format ครบทุก Byte: จึงไม่ควรเติม Endianness, Mode, Length Field หรือ Parameter Meaning เพิ่มจากการเดา
Command Prefix นี้ไม่ได้พิสูจน์ว่า Printer รองรับ ESC/POS ทั้งชุด: บทความต้นฉบับยืนยันเฉพาะ Command และ Behavior ที่ Creator ใช้กับ Printer ตัวนี้
ส่ง BLE เร็วที่สุด ไม่ได้แปลว่าพิมพ์ได้ดีที่สุด
เมื่อ Creator เริ่มส่ง Raster Data ปริมาณมาก ปัญหาที่เจอคือ:
Incomplete Prints
สาเหตุใน Project คือ Driver เท Data เข้า Printer เร็วกว่าที่ตัว Printer จะจัดการได้
Notification จาก FF03 จึงกลายเป็น Flow Control
↓ Data
FF02
↓
Printer
Printer
↓ Notification 01 01
FF03
↓
Driver ส่ง Data ชุดต่อไป
ค่าที่ ESP32 Version ใช้
| Setting | ค่าที่ Source ระบุ |
|---|---|
| Maximum Chunk | 120 bytes |
| Wait Timeout | 150 ms |
| Ready Notification | 01 01 |
120 bytes ไม่ใช่ BLE MTU ที่ Source ยืนยัน: มันคือ Maximum Chunk Size ที่ Creator ใช้ใน ESP32 Driver เท่านั้น
150 ms ก็ไม่ใช่ “เวลาพิมพ์ต่อ Packet”: นี่คือ Timeout ใน Logic ที่รอ Ready Signal ถ้า Notification ไม่มาในช่วงนั้น Code จะเดินหน้าต่อ ตาม Implementation ของ Creator
เมื่อ Protocol ใช้ได้แล้ว ค่อย Port จาก Python ไป C++ บน ESP32-C3
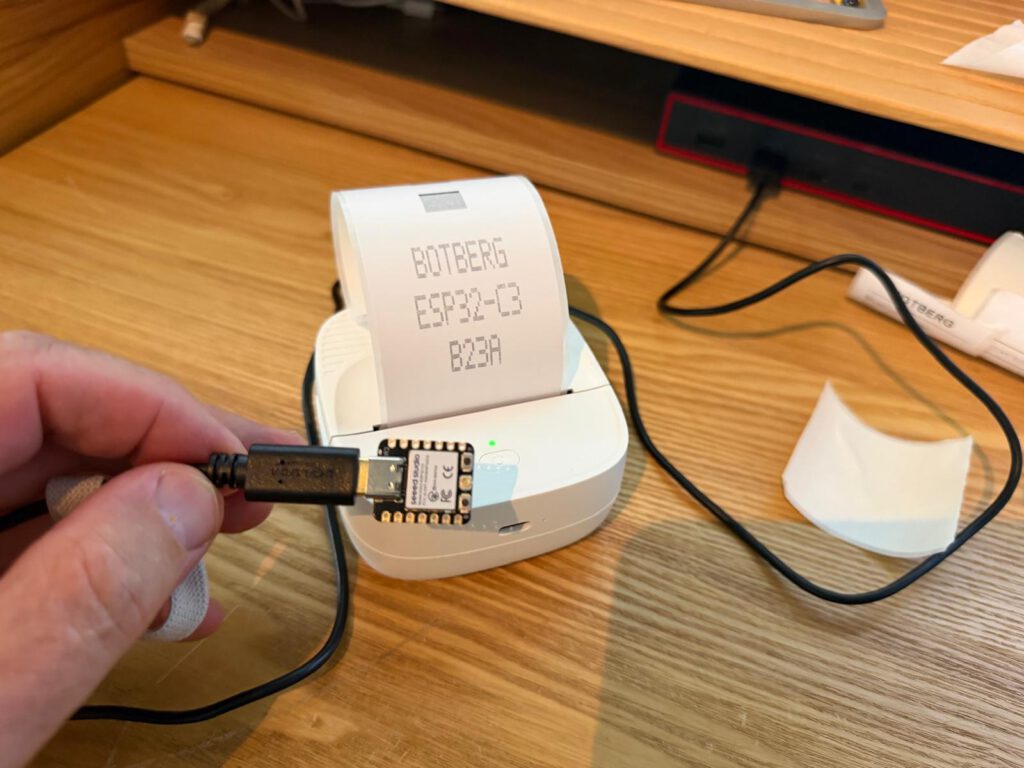
Embedded Version ใช้ Library ตาม Source:
#include <Arduino.h>
#include <NimBLEDevice.h>
#include <Adafruit_GFX.h>
#include <qrcode.h>| Library | หน้าที่ตาม Source |
|---|---|
| Arduino.h | พื้นฐานของ Embedded Application |
| NimBLE-Arduino | Bluetooth Low Energy |
| Adafruit GFX | สร้าง Graphic / Receipt Layout |
| qrcode.h | สร้าง QR Code |
Flow Control เดิม ถูก Port มาค่อนข้างตรง
bool sendChunk(const uint8_t* data, size_t length) {
    flowReady = false;

    bool result = ff02->writeValue(
        data, length, false
    );

    if (!result) return false;

    unsigned long start = millis();

    while (!flowReady) {
        delay(1);

        if (millis() - start > 150) {
            break;
        }
    }

    return true;
}
Callback ของ FF03 ทำหน้าที่ตั้ง:
flowReady = true
เมื่อ Printer ส่ง:
01 01
สิ่งที่ถูก Port ไม่ใช่แค่ Syntax: Logic ที่เคย Verify บน Python ทั้ง Write Characteristic, Notification และ Flow Control ถูกย้ายมายัง C++ โดยรักษาแนวคิดเดิม
ESP32-C3 Render Receipt เอง ไม่ต้องส่งรูปสำเร็จมาจาก Laptop
เมื่อ BLE Driver ทำงานได้แล้ว Project ขยับจาก “ส่ง Command” ไปเป็น “สร้าง Document บน Microcontroller”
Source ใช้:
GFXcanvas1 จาก Adafruit GFX
GFXcanvas1 canvas(
    PRINTER_WIDTH,
    CANVAS_HEIGHT
);
บน Monochrome Canvas Creator วาด:
- Text
- Lines
- Warning Symbols
- KPI Indicators
- Trend Graph
- QR Code
Icons ไม่ได้ใช้ Ready-made Bitmap แต่สร้างด้วย Primitive อย่าง:
drawLine()fillRect()drawCircle()drawTriangle()
ทำไมต้องแบ่งภาพเป็น Strip?
Source ประมวลผลภาพ เป็นแถบสูง:
32 pixels
หนึ่ง Row ใช้ 48 bytes ดังนั้น:
× 32 rows
=
1536 bytes Raster Data
+ 8 bytes Raster Header
≈ 1544 bytes Temporary Buffer
Complete Data Path จึงเป็น:
↓
1-bit Canvas
↓
Raster Buffer
↓
BLE Chunks
↓
FF02
↓
Printer
Compiler ผ่านยังไม่พอ — Receipt ต้องดูดีบนกระดาษจริง
ตอน Port และขยาย C++ Application Creator เจอ Compiler Error ที่คนทำ Embedded คุ้นเคย เช่น:
'canvas' was not declared in this scope

'drawWarningIcon' was not declared in this scope
Root Cause ไม่ใช่ Adafruit GFX แต่เป็น Code Structure: ส่วนหนึ่งของ renderTicket() ถูกวางผิดตำแหน่ง จน Object หรือ Function ถูกเรียกก่อนถูกประกาศ
Source แก้ด้วยการจัดลำดับใหม่:
- Libraries และ Global Objects
- Callbacks และ Drawing Functions
- Rendering และ Printing Logic
แล้วทำไมยังต้องพิมพ์กระดาษจริง?
เพราะ UI บน Thermal Paper ไม่เหมือน UI บน Display
Creator พบว่า:
- Icon ที่ดูดีบน Screen อาจเล็กเกินไปบนกระดาษ
- Text ต้องปรับให้เหมาะกับ Output จริง
- QR Code ต้องอ่านชัดบน Thermal Print
- Layout ต้องวัดจาก Physical Receipt ไม่ใช่ Preview อย่างเดียว
Source ไม่ได้กำหนด Universal Font Size หรือ QR Minimum Size: จึงไม่ควรสร้างค่า Print Layout แบบตายตัวสำหรับ Printer รุ่นอื่น
จาก Printer Driver สู่ Predictive Maintenance Receipt
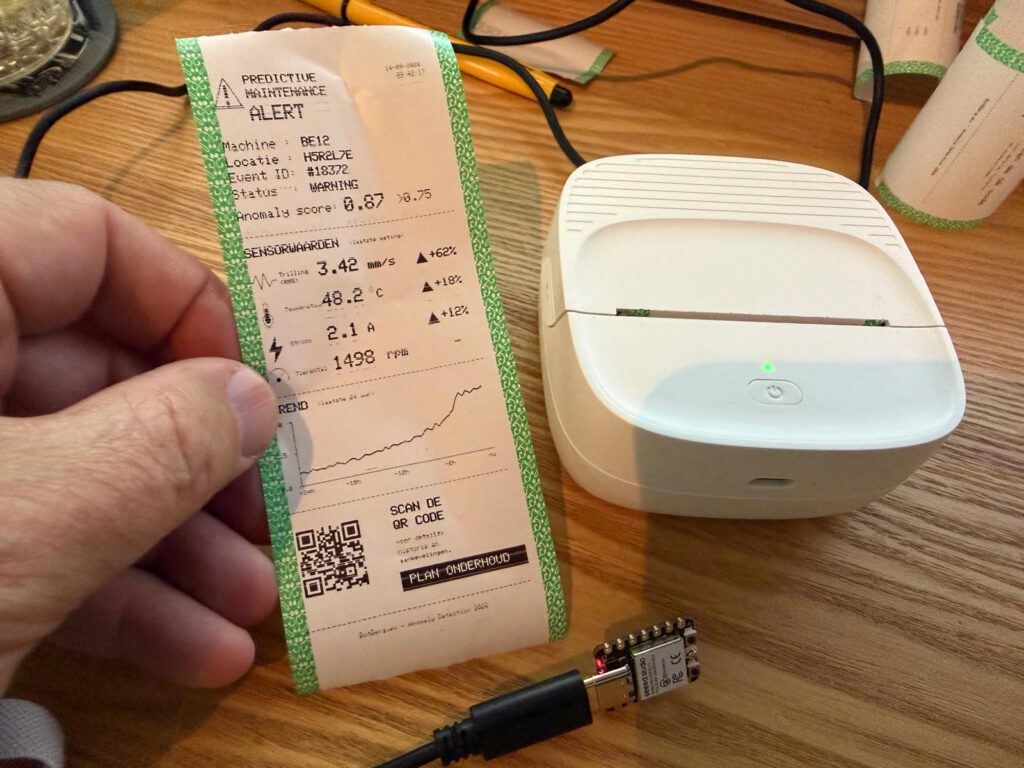
Application Demo ไม่ได้จบที่ Hello World แต่เป็น Sample Work Order สำหรับ Predictive Maintenance
Receipt ตัวอย่างประกอบด้วยข้อมูลอย่าง:
- Machine ID
- Location
- Event Number
- Anomaly Score
- Vibration KPI
- Temperature KPI
- Current KPI
- RPM KPI
- Trend Graph
- QR Code
Receipt นี้เป็น Sample Application: Source ไม่ได้ระบุว่า ESP32-C3 อ่าน Vibration, Temperature, Current หรือ RPM Sensor เหล่านี้โดยตรง และไม่ได้ระบุว่า Anomaly Detection Model รันอยู่บน ESP32-C3
Sensor in, paper out — Architecture ที่ Creator อยากต่อยอด
ESP32-C3 มีทั้ง BLE และ Wi-Fi ทำให้ Creator มองเห็นแนวทางต่อยอดไปยัง:
- MQTT
- REST Interface
- Machine Controller
- IoT Environment
Concept ที่อธิบายใน Source คือ:
↓
Anomaly Detection Somewhere in the System
↓
Alert ไป ESP32-C3
↓
Render Ticket
↓
BLE
↓
Paper Alert ข้างเครื่อง
MQTT / REST / Machine Integration เป็นแนวทางต่อยอด: Source ไม่ได้ให้ MQTT Topic, REST Endpoint, Sensor Wiring หรือ End-to-end Implementation สำหรับ Architecture นี้
สิ่งที่ Project พิสูจน์แล้ว และสิ่งที่ Source ยังไม่ได้บอก
| Source ยืนยัน | Source ไม่ได้ยืนยัน |
|---|---|
| Printer ตัวอย่างใช้ BLE และ Advertise เป็น B23a_7F36_BLE | BLE Version / PHY / Range |
| FF02 ใช้ส่ง Data | Protocol ใช้ได้กับ Printer รุ่นอื่น |
| FF03 ส่ง Ready Notification | Notification Protocol ของ Firmware Revision อื่น |
| Chunk สูงสุด 120 bytes ใน ESP32 Driver | Negotiated BLE MTU |
| Timeout 150 ms ใน Driver | Printer Processing Time ที่แน่นอน |
| Print Head กว้าง 384 pixels | DPI / Paper Width |
| Raster Prefix 1D 76 30 00 | Full Printer Command Set |
| ESP32-C3 Render Receipt ได้เอง | ESP32-C3 Board Model ที่ Creator ใช้ |
| ใช้ NimBLE / Adafruit GFX / qrcode.h | Library Versions |
| Printer มี 3.7V Li-ion Battery | Capacity / Runtime / Charging Spec |
| Predictive Maintenance Receipt เป็น Demo | Field Accuracy ของ Anomaly Detection |
BLE Reverse Engineering ควรทำกับ Hardware ที่เป็นของคุณเอง
Project นี้ศึกษา Pocket Printer ที่ Creator มีอยู่กับตัว โดยใช้ App, BLE Browser และการทดลอง Command เพื่อทำความเข้าใจ Protocol
ใช้แนวทางนี้กับ Hardware / Device ที่คุณเป็นเจ้าของหรือได้รับอนุญาตให้ทดสอบเท่านั้น: การค้นหา GATT, ส่ง Command หรือพยายามควบคุมอุปกรณ์ BLE ของบุคคลอื่น โดยไม่ได้รับอนุญาต ไม่ใช่ขอบเขตของบทความนี้
อีกจุดที่ควรระวังคือ Protocol ที่ Reverse Engineer จาก Unit หนึ่ง ไม่ควรถูกถือว่าเป็น Specification ของ Product Family ทั้งหมด จนกว่าจะทดสอบเพิ่ม
โปรเจกต์นี้มีหลายขั้น แนะนำอ่านต้นฉบับควบคู่กัน
Main Article มีรายละเอียดการเดินทางของ Project ตั้งแต่ Teardown, BLE Investigation, Python Driver, Raster, ESP32-C3 ไปจนถึง Final Receipt มากกว่าการดู Code Snippet แยกชิ้น
FAQ: ESP32-C3 Bluetooth Printer Driver
Project นี้ใช้ Printer รุ่นอะไร?
Source เรียกอุปกรณ์เป็น B23a Wireless Thermal Printer และ Hi.22.052 Pocket Printer โดย Unit ตัวอย่าง Advertise ชื่อ B23a_7F36_BLE
ESP32-C3 ต่อ Printer ด้วยสายหรือ Bluetooth?
Driver ใน Project คุยกับ Printer ผ่าน Bluetooth Low Energy
ต้องใช้ MAC Address CC:99:17:57:7F:36 เหมือนในบทความไหม?
ไม่ Address นี้เป็นของ Unit ที่ Creator ทดสอบ Printer เครื่องอื่นต้องใช้ Address ของตัวเอง
FF02 ใช้ทำอะไร?
ใน Driver ของ Creator FF02 ใช้ส่ง Data ไปยัง Printer
FF03 ใช้ทำอะไร?
ใช้รับ Notification จาก Printer โดย Driver สนใจค่า 01 01 เป็น Ready Signal
FF00 / FF02 / FF03 ใช้กับ Pocket Printer ทุกเครื่องหรือไม่?
Source ไม่ได้ระบุ ข้อมูลนี้ยืนยันเฉพาะ Printer / Firmware ที่ Creator ทดสอบ
ทำไมไม่เริ่มเขียนบน ESP32-C3 เลย?
Creator ใช้ Python เป็น Environment สำหรับทดลอง BLE, Command และ Flow Control เพราะแก้ Code และทดสอบได้เร็ว จากนั้นจึง Port Logic ที่ทำงานแล้วไป C++
Python ใช้ Library อะไร?
Source ใช้ Bleak สำหรับ Bluetooth Low Energy
ESP32-C3 ใช้ BLE Library อะไร?
Source ใช้ NimBLE-Arduino ผ่าน NimBLEDevice.h
Print Head กว้างเท่าไร?
Source ระบุ 384 pixels หรือ 48 bytes ต่อ Horizontal Raster Row เมื่อใช้ 1 bit ต่อ pixel
ทำไมต้องแบ่ง BLE Data เป็น Chunk?
Creator พบว่า การส่ง Raster Data จำนวนมากเร็วเกินไป ทำให้เกิด Incomplete Prints จึงใช้ Notification เป็น Flow Control และแบ่ง Data เป็นส่วนย่อย
120 bytes คือ BLE MTU หรือไม่?
Source ไม่ได้ระบุว่าเป็น MTU 120 bytes คือ Maximum Chunk Size ที่ ESP32 Implementation ของ Creator ใช้
150 ms คือ Print Speed หรือไม่?
ไม่ 150 ms คือ Timeout ใน Flow-control Wait Loop ไม่ใช่เวลาพิมพ์ต่อ Packet หรือ Printer Speed
Printer รองรับ ESC/POS ทั้งหมดหรือไม่?
Source ไม่ได้ระบุ Project ใช้ Raster Command ที่เริ่มด้วย 1D 76 30 00 แต่ข้อมูลนี้เพียงอย่างเดียว ไม่ยืนยัน Full ESC/POS Compatibility
ESP32-C3 สร้าง QR Code เองหรือไม่?
ใช่ใน Sample Application นี้ Source ใช้ qrcode.h สร้าง QR Code แล้ววาดลงบน Monochrome Canvas ก่อนแปลงเป็น Raster
Receipt ถูกสร้างบน Server หรือบน ESP32-C3?
Final Demo Render Layout บน ESP32-C3 ด้วย Adafruit GFX ก่อนส่ง Raster ไปยัง Printer
Anomaly Detection Model รันบน ESP32-C3 หรือไม่?
Source ไม่ได้ระบุ Creator เพียงอธิบายว่า Model อาจอยู่ที่จุดใดจุดหนึ่ง ในระบบ แล้วส่ง Alert มาให้ ESP32-C3 พิมพ์ออกมา
MQTT และ REST ใช้งานใน Build ปัจจุบันแล้วหรือยัง?
Source กล่าวถึงเป็นแนวทาง Future Integration แต่ไม่ได้ให้ MQTT Topic, REST API หรือ Implementation ที่ทำงานจริงในบทความนี้
ใช้ Driver นี้กับ Pocket Printer รุ่นอื่นได้ไหม?
Source ไม่ได้ทดสอบ Compatibility กับ Printer รุ่นอื่น จึงไม่ควรสมมติว่า BLE UUID, Command หรือ Flow Control จะเหมือนกัน
สรุป: สิ่งที่น่าสนใจไม่ใช่ Printer แต่คือวิธีคิดของการ Reverse Engineer
Project นี้เริ่มจาก Consumer Gadget เล็ก ๆ ที่ปกติถูกล็อก Workflow ไว้กับ Mobile App
แต่แทนที่จะกระโดดไปเขียน Embedded Code ยาว ๆ ผู้สร้างแยกปัญหาออกทีละชั้น:
↓
สำรวจ BLE
↓
ทดลอง Command ด้วย Python
↓
พิมพ์ Raster
↓
เจอปัญหา Flow Control
↓
แก้ให้เสถียร
↓
Port ไป ESP32-C3
↓
Render Receipt บน MCU
ผลลัพธ์จึงไม่ใช่แค่ “ESP32 สั่ง Printer ได้” แต่เป็นตัวอย่างที่ดีของ Workflow:
Reverse Engineer บน Platform ที่ทดลองเร็ว แล้วค่อย Embed สิ่งที่เข้าใจแล้วลง Microcontroller
และเมื่อ Driver กลายเป็นส่วนหนึ่งของ Embedded System Printer ก็ไม่จำเป็นต้องเป็น Gadget สำหรับพิมพ์ Sticker จากมือถืออีกต่อไป
มันสามารถกลายเป็น Physical Output สำหรับ IoT, Machine Alert หรือระบบอื่น ที่ต้องการเปลี่ยน Digital Event ให้เป็นกระดาษที่หยิบไปทำงานต่อได้
หรืออย่างที่ Creator สรุปไว้:
Sensor in, paper out.
References / แหล่งข้อมูลต้นฉบับ
กำลังทำ ESP32, BLE หรือ IoT Project อยู่?
Project แบบนี้ ไม่ได้มีแค่เรื่อง Bluetooth แต่ต้องมองทั้ง Board, Protocol, Data Flow, Graphics, Sensor Input และ Physical Output ไปพร้อมกัน
ถ้ากำลังทำ ESP32, ESP32-C3, BLE, IoT, Sensor หรือ Embedded Project สามารถสอบถามทีม Globalbyte เรื่อง Development Board, Module, Sensor และ Maker Accessories ที่เหมาะกับ Project ได้
บทความนี้ไม่ได้ยืนยันว่า Pocket Printer รุ่นเดียวกับต้นฉบับ, ESP32-C3 Board รุ่นเดียวกับผู้สร้าง หรืออุปกรณ์เฉพาะใน Project มี Stock อยู่ที่ Globalbyte กรุณาสอบถามรุ่นและ Availability ก่อนสั่งซื้อ


