
ติดตั้ง MemryX MX3 บน Raspberry Pi 5 ให้พร้อมรัน Edge AI
ถ้า Raspberry Pi 5 ของเราทำ Linux, GPIO และงาน Embedded ได้อยู่แล้ว คำถามต่อไปของสาย Maker ก็คือ จะพามันไปทำ Computer Vision แบบจริงจังขึ้นได้ยังไง?
โปรเจกต์นี้พาไปไกลกว่าการเสียบ AI Accelerator แล้วจบ เพราะเริ่มตั้งแต่เขียน Raspberry Pi OS ลง microSD, ประกอบ MemryX MX3 M.2 AI Accelerator, ติดตั้ง Driver, Runtime และ SDK, ทดลอง MediaPipe Hands กับ YOLOE ก่อนปิดท้ายด้วยการเอา Computer Vision ไปควบคุม LED ผ่าน GPIO จริง
ผู้เขียนต้นฉบับเล่าว่าเคยเจอข้อจำกัดของ Microcontroller ทั้ง Memory และ Processing Power รวมถึงการต้องเพิ่ม Module แยกเมื่ออยากได้ Wireless, Cellular หรือ GPS ก่อนจะหันมาทำงานกับ Single-board Computer และเคยใช้ Raspberry Pi ทำระบบเช็กชื่อนักศึกษาในโปรเจกต์จบวิศวกรรมไฟฟ้า
จากตรงนั้นจึงมาถึงโจทย์ของบทความนี้: เปลี่ยน Raspberry Pi 5 ให้กลายเป็นแพลตฟอร์ม Edge AI ที่มองภาพจาก Webcam และสั่ง Hardware จริงได้

Key Takeaways
- โปรเจกต์ใช้ Raspberry Pi 5 โดยต้นฉบับแนะนำรุ่น RAM 8GB ร่วมกับ MemryX MX3 M.2 AI Accelerator และ PCIe HAT
- เริ่มจาก Raspberry Pi OS แบบ 64-bit ก่อนติดตั้ง MemryX Driver, Runtime และ SDK
- ขั้นตอนจากต้นฉบับทดสอบกับ MemryX SDK 2.2 และใช้ Python 3.12 ใน Virtual Environment
- ทดสอบ Computer Vision ด้วย MediaPipe Hand Landmarks Tracking และ YOLOE Open-Vocabulary Segmentation
- โปรเจกต์สุดท้ายใช้ Webcam ตรวจจับมือ แล้วเชื่อมผล Computer Vision เข้ากับ GPIO เพื่อเปิด-ปิด LED
- Code Snippet ในบทความนี้มาจาก Source ต้นฉบับ และถูกซ่อนไว้ด้วย View more เพื่อไม่ให้บทความยาวจนอ่านยาก
ก่อนเริ่ม: คู่มือต้นฉบับระบุว่าขั้นตอน Software ถูกทดสอบกับ MemryX SDK 2.2 และ Software, Package, Repository หรือ Python Compatibility สามารถเปลี่ยนได้ในอนาคต หากคำสั่งติดตั้งไม่ตรงกับเวอร์ชันปัจจุบัน ให้ตรวจสอบ คู่มือติดตั้ง Software ล่าสุดจาก MemryX Developer Hub ก่อนแก้คำสั่งเอง
โปรเจกต์นี้จะทำอะไร?
Workflow ของต้นฉบับเดินจาก “บอร์ดเปล่า” ไปถึง “Computer Vision ควบคุม Hardware” เป็น 6 ช่วงต่อเนื่องกัน
เตรียม Raspberry Pi OS
เขียน Raspberry Pi OS 64-bit ลง microSD ด้วย Raspberry Pi Imager
ตั้งค่า Raspberry Pi Desktop
ต่อจอ Mouse Keyboard และ Network แล้วผ่าน Initial Setup Wizard
ประกอบ MemryX MX3
ใส่ Heatsink, PCIe HAT, Ribbon Cable และ MX3 M.2 Module ลงบน Raspberry Pi 5
ติดตั้ง Driver, Runtime และ SDK
ติดตั้ง MemryX Software และสร้าง Python 3.12 Virtual Environment
ลอง Computer Vision จริง
ใช้ MediaPipe Hands ตรวจ Landmark ของมือ และใช้ YOLOE ตรวจจับ/Segment Object จาก Webcam
เอา AI ไปคุม LED
ต่อ LED เข้ากับ Raspberry Pi GPIO แล้วใช้ตำแหน่งนิ้วจาก Computer Vision Toggle ไฟ ON/OFF
อุปกรณ์ที่ต้องใช้
| อุปกรณ์ | รายละเอียดจากต้นฉบับ |
|---|---|
| Raspberry Pi 5 | ต้นฉบับแนะนำ 8GB RAM หรือมากกว่า และแนะนำ Complete Kit |
| MemryX MX3 | MemryX MX3 M.2 Edge AI Accelerator จำนวน 1 ตัว |
| PCIe HAT | M.2 to PCIe HAT สำหรับ Raspberry Pi |
| Display | Monitor ที่มี HDMI Input |
| Input | Mouse และ Keyboard |
| Webcam | ใช้สำหรับ Computer Vision Example และ Gesture Control |
| Storage | microSD Card + Card Reader |
| LED Project | LED, Jumper Male-to-Female 2 เส้น, Resistor 100–330Ω, Breadboard |
กำลังเตรียมของสำหรับโปรเจกต์? ถ้าต้องการ Raspberry Pi 5, บอร์ดพัฒนา หรืออุปกรณ์ Maker สามารถสอบถามทีม Globalbyte ผ่าน LINE OA Globalbyte ก่อนเลือกอุปกรณ์ให้เข้ากับโปรเจกต์ได้
Step 1: เตรียม Raspberry Pi OS ลง microSD
เริ่มจาก Raspberry Pi 5 ให้เป็น Linux Computer ที่พร้อมใช้งานก่อน โดยต้นฉบับใช้ Raspberry Pi OS เวอร์ชัน 64-bit
สิ่งที่ต้องมีในขั้นตอนนี้
- microSD Card
- microSD Card Reader
- คอมพิวเตอร์ Linux, macOS หรือ Windows
ขั้นตอน
- ดาวน์โหลดและติดตั้ง Raspberry Pi Imager จากเว็บไซต์ทางการของ Raspberry Pi
- เสียบ microSD Card เข้าคอมพิวเตอร์ผ่าน Card Reader
- เปิด Raspberry Pi Imager
- เลือก Device เป็น Raspberry Pi 5
- เลือก Operating System เป็น Raspberry Pi OS เวอร์ชันล่าสุดแบบ 64-bit
- เลือก microSD Card เป็น Storage
- ที่หน้า Customization ต้นฉบับเลือก Skip Customization
- กด Write เพื่อให้ Imager ลบข้อมูลเดิมและเขียน OS ลง microSD
ระวัง: ขั้นตอน Write จะลบข้อมูลบน microSD Card ให้ตรวจสอบว่าเลือก Storage ถูกตัว และ Backup ข้อมูลที่ต้องการไว้ก่อน
เมื่อ Raspberry Pi Imager เขียนระบบเสร็จ ให้นำ microSD ออกจากคอมพิวเตอร์อย่างปลอดภัย แล้วใส่เข้า Raspberry Pi 5
Step 2: ตั้งค่า Raspberry Pi Desktop ครั้งแรก
ต่ออุปกรณ์ก่อนเปิดเครื่อง
- ต่อ HDMI-to-micro-HDMI จาก Monitor ไปที่ HDMI 0 ของ Raspberry Pi
- ต่อ Mouse และ Keyboard ผ่าน USB
- หากใช้ Ethernet ให้เสียบสาย Network ก่อน
- ต่อ Power Adapter เข้าพอร์ต USB-C ของ Raspberry Pi
เมื่อ Boot ขึ้นมา จะเจอหน้าต่าง Welcome to the Raspberry Pi Desktop สำหรับตั้งค่าครั้งแรก
เดินตาม Setup Wizard
- กด Next ที่ Welcome Screen
- เลือก Country, Language และ Time Zone และเลือก Use US keyboard หากกำลังใช้ Layout แบบ US
- สร้าง Username และ Password
- เลือก Wi-Fi แล้วใส่ Password หรือข้ามได้หากใช้ Ethernet
- เลือก Web Browser ที่ต้องการ
- ระบบจะถามเรื่อง Software Update ซึ่งต้นฉบับแนะนำให้อัปเดตในขั้นตอนนี้ หาก Internet พร้อม
- หน้าสุดท้ายกด Launch
ตอนนี้ Raspberry Pi Desktop พร้อมสำหรับการติดตั้ง MX3 แล้ว
Step 3: ติดตั้ง MemryX MX3 Hardware
ขั้นตอนนี้มีชิ้นส่วนเล็กและ Connector หลายจุด จึงควรทำช้า ๆ และตรวจ Orientation ก่อนกดหรือขันทุกครั้ง
3.1 เตรียม MX3 และ Heatsink
- วาง Accelerator บน Bracket Heatsink สีเทา โดยหันด้านบนขึ้น
- เช็ก Alignment Post เล็ก ๆ ให้เข้าในรูวงกลมของ Accelerator Board
- วาง Heatsink ด้านบน และจัดรู Screw ให้ตรงกัน
- ใส่ Screw สีดำทั้ง 4 ตัว แล้วขันอย่างเบามือ
ห้ามขันฝืน: หากรู้สึกว่ามีแรงต้านผิดปกติ ให้หยุดและจัดตำแหน่ง Heatsink / Bracket ใหม่ ไม่ควรขัน Screw จนแน่นเกินไป
3.2 ติดตั้ง PCIe HAT
- ใส่ Screw ของ HAT ลงใน Mounting Hole และยึดด้วย Brass Standoff ทั้ง 4 จุด
- เตรียม PCIe Ribbon Cable ซึ่งมีด้านระบุ To RPi และ To HAT
- ด้าน To RPi ต้องต่อเข้ากับ Raspberry Pi
- ต้นฉบับระบุให้ Printed Markings หันออกจาก Raspberry Pi และตอนใส่ Cable ให้ Marking หันไปทาง microSD Card
- กด Brown Locking Tab เพื่อยึด Ribbon Cable
- วาง HAT ด้านบน Raspberry Pi พร้อมจัด GPIO Header และ Mounting Hole ให้ตรง
- เปิด Gray Locking Tab บน HAT แล้วใส่ปลาย Ribbon Cable อีกด้าน
- กด Locking Tab กลับลง เพื่อยึด Cable
3.3 ใส่ MX3 ลง M.2 Slot
- ใส่ MX3 Module เข้า M.2 Slot ที่มุมประมาณ 35 องศา
- ค่อย ๆ กดปลายอีกด้านลง จนรู Mounting ตรงกับ PCB
- ยึดด้วย M.2 Screw แค่พอให้ Module อยู่ราบและไม่ขยับ
Cooling สำคัญ: เอกสาร MemryX ระบุว่า Chip สามารถเริ่ม Thermal Throttling เมื่ออุณหภูมิถึง 100°C จึงควรมี Airflow ผ่าน Heatsink โดยเฉพาะเมื่อต้องรัน AI ต่อเนื่อง
หากต้องการดูรายละเอียดฮาร์ดแวร์จากผู้ผลิตโดยตรง ให้เปิด คู่มือติดตั้ง MX3 M.2 จาก MemryX ประกอบก่อนเปิดเครื่อง
Step 4: ติดตั้ง MemryX Runtime และ SDK
Hardware อยู่ครบแล้ว รอบนี้เข้าสู่ Linux Terminal เพื่อติดตั้ง Driver, Runtime Libraries และ Developer Tools
4.1 ติดตั้ง Runtime
เปิด Terminal ด้วย Icon หรือกด Ctrl + Alt + T
sudo apt update
sudo apt full-upgrade -y
sudo rebootsudo apt-get install linux-headers-$(uname -r)wget -qO- https://developer.memryx.com/deb/memryx.asc | sudo tee /etc/apt/trusted.gpg.d/memryx.asc >/dev/nullecho 'deb https://developer.memryx.com/deb stable main' | sudo tee /etc/apt/sources.list.d/memryx.list >/dev/nullsudo apt-get update && sudo apt-get install memx-drivers memx-acclsudo mx_arm_setupsudo rebootcat /sys/memx0/temperatureapt policy memx-driverssudo apt-get install memx-accl-plugins memx-utils-guiเมื่อรัน sudo mx_arm_setup ให้เลือก Raspberry Pi 5 ตามขั้นตอนต้นฉบับ แล้ว Reboot
หลัง Boot กลับมา ใช้ apt policy memx-drivers เช็ก Driver โดยตัวอย่างในต้นฉบับเห็น Version ประมาณ 2.2.1-3
ส่วน Plugins และ Utility Libraries ในบทความต้นฉบับมี Download ประมาณ 1.4GB จึงอาจใช้เวลาสักพัก
4.2 ติดตั้ง MemryX Tools ด้วย Python 3.12
จุดนี้ต้องอ่านดี ๆ เพราะต้นฉบับระบุว่า Raspberry Pi OS ที่ใช้มี Python 3.13 แต่ MemryX Tools ณ เวลาที่เขียนบทความ ยังไม่รองรับ Version นี้
ผู้เขียนจึงใช้ uv ติดตั้ง Python 3.12 และสร้าง Virtual Environment ชื่อ ~/mx
curl -LsSf https://astral.sh/uv/install.sh | sh
source $HOME/.local/bin/env# install 3.12
uv python install 3.12
# Create the environment and include pip
uv venv --seed --python 3.12 ~/mx
# activate the venv
source ~/mx/bin/activate
# Upgrade the packaging tools
python -m pip install --upgrade pip wheel
# clear shell's command lookup cache
hash -rsudo apt-get update && sudo apt-get install libhdf5-dev python3-dev cmake python3-venv build-essentialuv pip install --index-url https://developer.memryx.com/pip --extra-index-url https://pypi.org/simple memryxmx_nc --versionต้นฉบับระบุว่า System Dependencies มี Download ราว 111MB ส่วน MemryX Python Package ราว 2.2GB
เมื่อรัน mx_nc --version ตัวอย่างในคู่มือแสดง Version 2.2.1
Step 5: ทดลอง Computer Vision บน Raspberry Pi 5
Driver พร้อม SDK พร้อม รอบนี้ได้เวลาเช็กว่าระบบ AI ใช้งานจริงได้หรือยัง
ต้นฉบับเลือก 2 Example จาก MemryX Examples:
- MediaPipe Hand Landmarks Tracking
- YOLOE Open-Vocabulary Segmentation
Clone MemryX Examples ก่อน
git clone --recursive https://github.com/memryx/memryx_examples.gitsource ~/mx/bin/activate5.1 MediaPipe Hand Landmarks Tracking
Example นี้รับ Live Video จาก Webcam ส่ง Frame ไปยัง MemryX Accelerator ตรวจจับมือ แล้ววาด Landmark ลงบนภาพ
ระบบยังสามารถแยกมือซ้ายกับมือขวาได้ และนี่คือฐานที่นำไปต่อยอด Gesture Control ใน Step สุดท้าย
cd
cd memryx_examples/video_inference/mediapipe_hands/uv pip install opencv-python==4.11.0.86mkdir models
wget https://developer.memryx.com/example_files/2p2/mediapipe_hands.zip
unzip mediapipe_hands.zip -d modelsmx_nc -v -m path/to/modelcd src/python
python3 run.pyถ้า Compile Model เอง ต้นฉบับกำหนดให้ตั้งชื่อ models.dfp และวางไว้ใน Folder models
5.2 YOLOE Open-Vocabulary Segmentation
Example ที่สองคือ YOLOE ซึ่งเปิดให้ใส่ชื่อ Object Category ที่ต้องการตรวจจับ แล้วระบบจะ Detect และ Segment Object ที่ตรงกับ Class นั้นใน Live Video
Interface ยังมี Option เปิดหรือปิด Segmentation และ Remove Background เพื่อให้เหลือเฉพาะ Object ที่ตรวจพบ
cd
cd memryx_examples/open_vocabulary/yoloeuv pip install -r requirements.txtwget https://developer.memryx.com/example_files/2p2/YoloE-v8s-seg_640_640_3_onnx.zip
mkdir -p models
unzip YoloE-v8s-seg_640_640_3_onnx.zip -d modelsmx_nc -v -m modelcd src/python
python3 demo.py # default video path /dev/video0Step 6: ใช้ Computer Vision ควบคุม LED จริง
ถึงตรงนี้เรามีทั้ง AI Accelerator, Webcam และ Hand Tracking แล้ว ขั้นสุดท้ายคือเอาผลจาก Computer Vision ออกจากหน้าจอ แล้วเชื่อมกับ Hardware จริงผ่าน GPIO
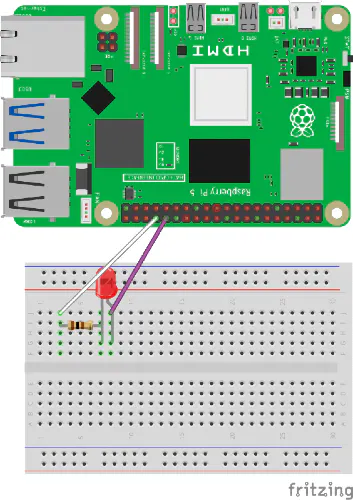
6.1 ต่อวงจร LED
อุปกรณ์:
- Raspberry Pi 5
- LED สีใดก็ได้
- Male-to-Female Jumper 2 เส้น
- Resistor 100Ω โดยต้นฉบับระบุว่าใช้ 100–330Ω ได้
- Breadboard
การต่อ
- เสียบ LED ลง Breadboard
- ต่อ Resistor แบบ Series เข้ากับขา Negative ของ LED
- ขายาวของ LED โดยทั่วไปคือ Positive หรือ Anode ส่วนขาสั้นคือ Negative หรือ Cathode
- ต่อ Physical Pin 32 ซึ่งตรงกับ BCM GPIO 12 ไปยังขา Positive ของ LED
- ต่อ Physical Pin 34 หรือ Ground Pin ที่ว่าง ไปยังปลาย Resistor อีกด้าน
เช็ก Pin Numbering ให้ชัด: ต้นฉบับใช้ BCM GPIO 12 = Physical Pin 32 อย่าสลับระหว่างเลข GPIO กับ Physical Pin ก่อนต่อวงจรจริง
6.2 ทดสอบ Blink LED ก่อน
ก่อนเอา AI เข้ามาเกี่ยว ให้เช็กพื้นฐานก่อนว่าวงจร LED และ GPIO ทำงานถูกต้อง
pip3 uninstall RPi.GPIO
pip3 install rpi-lgpionano led_on_off.pyimport RPi.GPIO as GPIO
import time
LED_PIN = 12
GPIO.setmode(GPIO.BCM)
GPIO.setup(LED_PIN, GPIO.OUT)
try:
while True:
GPIO.output(LED_PIN, GPIO.HIGH)
print("LED ON")
time.sleep(1)
GPIO.output(LED_PIN, GPIO.LOW)
print("LED OFF")
time.sleep(1)
except KeyboardInterrupt:
print("Stopped")
finally:
GPIO.cleanup()python3 led_on_off.pyถ้า LED กระพริบ ON/OFF ทุกประมาณ 1 วินาที แปลว่าส่วน Circuit และ GPIO พร้อมแล้ว
6.3 เอา MediaPipe Hands มาคุม LED
ขั้นตอนสุดท้ายคือรวม MediaPipe Hands จาก Step 5 เข้ากับ GPIO Code
โปรแกรมจะสร้าง Toggle Box ที่มุมซ้ายบนของภาพ Webcam และใช้ Index Fingertip Landmark หมายเลข 8 ตรวจว่าปลายนิ้วเข้าไปอยู่ใน Box หรือไม่
เมื่อปลายนิ้ว “เข้า Box ครั้งแรก” ระบบจะ Toggle LED หนึ่งครั้ง และใช้ตัวแปร touching_box ป้องกันไม่ให้ LED Toggle ซ้ำต่อเนื่อง ขณะที่นิ้วยังค้างอยู่ใน Box
cd memryx_examples/video_inference/mediapipe_hands/src/pythonnano led_hand_toggle.pyimport threading
import cv2
import sys
import os
import numpy as np
from pathlib import Path
from MxHandPose import MxHandPose
import time
import RPi.GPIO as GPIO
LED_PIN = 12 # BCM GPIO12, physical pin 32
class MediapipeHandsDemo:
def __init__(self, mxpose, **kwargs):
self.mxpose = mxpose
# GPIO LED setup
GPIO.setmode(GPIO.BCM)
GPIO.setup(LED_PIN, GPIO.OUT)
GPIO.output(LED_PIN, GPIO.LOW)
self.led_on = False
# Used so one touch toggles only once
self.touching_box = False
# Threading
self.stop_event = threading.Event()
self.camera_read_thread = threading.Thread(target=self.camera_read, daemon=True)
self.display_thread = threading.Thread(target=self.and_display, daemon=True)
self.cam_width = 0
self.cam_height = 0
self.cap = self.video_capture()
# Start threads
self.camera_read_thread.start()
self.display_thread.start()
# Keep main thread alive
self.camera_read_thread.join()
self.display_thread.join()
##############################################################################################################
# LED control
##############################################################################################################
def toggle_led(self):
self.led_on = not self.led_on
if self.led_on:
GPIO.output(LED_PIN, GPIO.HIGH)
print("LED ON")
else:
GPIO.output(LED_PIN, GPIO.LOW)
print("LED OFF")
def cleanup(self):
try:
GPIO.output(LED_PIN, GPIO.LOW)
GPIO.cleanup()
except Exception:
pass
##############################################################################################################
# Camera capture and display
##############################################################################################################
def video_capture(self):
camera = cv2.VideoCapture(0)
camera.set(cv2.CAP_PROP_FOURCC, cv2.VideoWriter_fourcc(*'MJPG'))
camera.set(cv2.CAP_PROP_FPS, 30)
self.cam_width = int(camera.get(cv2.CAP_PROP_FRAME_WIDTH))
self.cam_height = int(camera.get(cv2.CAP_PROP_FRAME_HEIGHT))
return camera
def camera_read(self):
if not self.cap.isOpened():
print("Error: Could not open camera.")
self.cleanup()
return
while not self.stop_event.is_set():
ret, frame = self.cap.read()
if not ret:
print("Error: Could not read frame.")
break
if not self.mxpose.full():
frame = cv2.cvtColor(frame, cv2.COLOR_BGR2RGB)
self.mxpose.put(frame)
self.mxpose.stop()
self.cap.release()
self.cleanup()
os._exit(0)
def and_display(self):
cv2.namedWindow('MediapipeHands', cv2.WINDOW_NORMAL)
cv2.resizeWindow('MediapipeHands', self.cam_width + 20, self.cam_height + 20)
while not self.stop_event.is_set():
if cv2.getWindowProperty('MediapipeHands', cv2.WND_PROP_VISIBLE) < 1:
self.stop_event.set()
break
if not self.mxpose.empty():
annotated_frame = self.mxpose.get()
frame = self.draw(annotated_frame)
frame = cv2.cvtColor(frame, cv2.COLOR_RGB2BGR)
cv2.imshow('MediapipeHands', frame)
key = cv2.waitKey(1) & 0xFF
if key == ord('q') or key == 27:
self.stop_event.set()
break
cv2.destroyAllWindows()
self.cleanup()
os._exit(0)
##############################################################################################################
# Drawing and interaction
##############################################################################################################
def draw(self, annotated_frame):
handkeypoints_lst, handtype_lst = self.get_handkeypoints_handtype(annotated_frame)
img = annotated_frame.image
currently_touching = False
# Draw hand/finger landmarks again
for i, hand_points in enumerate(handkeypoints_lst):
is_left = False
if i < len(handtype_lst):
is_left = str(handtype_lst[i]).lower() == "left"
img = self.drawLandmarks(img, [hand_points], is_left)
# Index fingertip is landmark 8
fingertip = hand_points[8]
if self.check_box_touch(fingertip):
currently_touching = True
# Toggle only when finger first enters the box
if currently_touching and not self.touching_box:
self.toggle_led()
self.touching_box = currently_touching
# Draw the toggle box
img = self.draw_toggle_box(img)
'''
# Show LED state text
state_text = "LED: ON" if self.led_on else "LED: OFF"
state_color = (0, 255, 0) if self.led_on else (255, 0, 0)
cv2.putText(
img,
state_text,
(20, 110),
cv2.FONT_HERSHEY_SIMPLEX,
0.9,
state_color,
2,
cv2.LINE_AA
)
'''
return img
def get_handkeypoints_handtype(self, annotated_frame):
handkeypoints_lst = []
handtype_lst = []
for handpose in annotated_frame.handposes:
hp_reshaped = handpose.landmarks.reshape(21, 3).astype(np.int32)
singlehand_keypoints = [(int(x), int(y)) for x, y, z in hp_reshaped]
handkeypoints_lst.append(singlehand_keypoints)
handtype_lst.append(handpose.handedness)
return handkeypoints_lst, handtype_lst
##############################################################################################################
# One toggle box
##############################################################################################################
def get_toggle_box_region(self):
return {
"name": "TOGGLE",
"x1": 20,
"y1": 20,
"x2": 170,
"y2": 80,
}
def check_box_touch(self, fingertip):
x, y = fingertip
box = self.get_toggle_box_region()
return box["x1"] <= x <= box["x2"] and box["y1"] <= y <= box["y2"]
def draw_toggle_box(self, frame):
box = self.get_toggle_box_region()
x1 = box["x1"]
y1 = box["y1"]
x2 = box["x2"]
y2 = box["y2"]
if self.led_on:
fill_color = (0, 255, 0) # green in RGB
text_color = (0, 0, 0)
label = "ON"
else:
fill_color = (255, 0, 0) # red in RGB
text_color = (255, 255, 255)
label = "OFF"
# Filled box
cv2.rectangle(frame, (x1, y1), (x2, y2), fill_color, -1)
# Border
cv2.rectangle(frame, (x1, y1), (x2, y2), (255, 255, 255), 3)
# Text
cv2.putText(
frame,
f"TOGGLE {label}",
(x1 + 10, y1 + 38),
cv2.FONT_HERSHEY_SIMPLEX,
0.7,
text_color,
2,
cv2.LINE_AA
)
return frame
##############################################################################################################
# Hand landmark drawing
##############################################################################################################
def drawLandmarks(self, frame, data, is_left):
allhands = data
if is_left:
color = (255, 0, 255)
else:
color = (0, 255, 255)
for myHand in allhands:
cv2.line(frame, (myHand[0][0], myHand[0][1]), (myHand[1][0], myHand[1][1]), color, 2)
cv2.line(frame, (myHand[1][0], myHand[1][1]), (myHand[2][0], myHand[2][1]), color, 2)
cv2.line(frame, (myHand[2][0], myHand[2][1]), (myHand[3][0], myHand[3][1]), color, 2)
cv2.line(frame, (myHand[3][0], myHand[3][1]), (myHand[4][0], myHand[4][1]), color, 2)
cv2.line(frame, (myHand[0][0], myHand[0][1]), (myHand[5][0], myHand[5][1]), color, 2)
cv2.line(frame, (myHand[5][0], myHand[5][1]), (myHand[6][0], myHand[6][1]), color, 2)
cv2.line(frame, (myHand[6][0], myHand[6][1]), (myHand[7][0], myHand[7][1]), color, 2)
cv2.line(frame, (myHand[7][0], myHand[7][1]), (myHand[8][0], myHand[8][1]), color, 2)
cv2.line(frame, (myHand[0][0], myHand[0][1]), (myHand[17][0], myHand[17][1]), color, 2)
cv2.line(frame, (myHand[17][0], myHand[17][1]), (myHand[18][0], myHand[18][1]), color, 2)
cv2.line(frame, (myHand[18][0], myHand[18][1]), (myHand[19][0], myHand[19][1]), color, 2)
cv2.line(frame, (myHand[19][0], myHand[19][1]), (myHand[20][0], myHand[20][1]), color, 2)
cv2.line(frame, (myHand[5][0], myHand[5][1]), (myHand[9][0], myHand[9][1]), color, 2)
cv2.line(frame, (myHand[9][0], myHand[9][1]), (myHand[13][0], myHand[13][1]), color, 2)
cv2.line(frame, (myHand[13][0], myHand[13][1]), (myHand[17][0], myHand[17][1]), color, 2)
cv2.line(frame, (myHand[9][0], myHand[9][1]), (myHand[10][0], myHand[10][1]), color, 2)
cv2.line(frame, (myHand[10][0], myHand[10][1]), (myHand[11][0], myHand[11][1]), color, 2)
cv2.line(frame, (myHand[11][0], myHand[11][1]), (myHand[12][0], myHand[12][1]), color, 2)
cv2.line(frame, (myHand[13][0], myHand[13][1]), (myHand[14][0], myHand[14][1]), color, 2)
cv2.line(frame, (myHand[14][0], myHand[14][1]), (myHand[15][0], myHand[15][1]), color, 2)
cv2.line(frame, (myHand[15][0], myHand[15][1]), (myHand[16][0], myHand[16][1]), color, 2)
for point in myHand:
cv2.circle(frame, (point[0], point[1]), 4, (23, 90, 10), 1)
for point in myHand:
cv2.circle(frame, (point[0], point[1]), 3, (255, 255, 125), -1)
# Highlight index fingertip clearly
fingertip = myHand[8]
cv2.circle(frame, (fingertip[0], fingertip[1]), 8, (0, 255, 0), 2)
return frame
if __name__ == '__main__':
project_dir = Path(__file__).resolve().parents[2]
mx_modeldir = project_dir / 'models'
try:
mx_pose = MxHandPose(mx_modeldir=mx_modeldir, num_hands=2)
paint = MediapipeHandsDemo(mxpose=mx_pose)
except (FileNotFoundError, RuntimeError) as exc:
print(f"Failed to start Mediapipe Hands: {exc}", file=sys.stderr)
GPIO.cleanup()
sys.exit(1)
except KeyboardInterrupt:
print("Stopped")
GPIO.cleanup()
sys.exit(0)python3 led_hand_toggle.pyตำแหน่งไฟล์สำคัญ: ต้นฉบับเตือนให้เก็บ led_hand_toggle.py ไว้ใน Directory ที่กำหนด เพราะ Code อ้างอิง File และ Module อื่น ที่อยู่ในโครงสร้างของ MediaPipe Hands Example
เมื่อรันโปรแกรม หน้าต่าง Camera จะเปิดขึ้น พร้อมตรวจจับและ Highlight มือ และจะมี Toggle Box อยู่ด้านซ้ายบน
เมื่อนำปลายนิ้วเข้าไปใน Box LED จะเปลี่ยน ON/OFF เท่านี้ Computer Vision ก็เชื่อมกับ Physical Electronics ได้แล้ว
ภาพและวิดีโอขั้นตอนทั้งหมดจากต้นฉบับ
เนื่องจาก Source มีภาพจำนวนมาก จึงแสดงเฉพาะ Hero Image ด้านบนเป็นค่าเริ่มต้น ส่วน Media อื่นทั้งหมดซ่อนไว้ใน View more ตามรูปแบบที่กำหนดสำหรับบทความ Global Byte
ภาพรวมโปรเจกต์

Step 1–2: Raspberry Pi OS และ Desktop Setup


Step 3: ติดตั้ง MemryX MX3 และ PCIe HAT


Step 5: MediaPipe Hands และ YOLOE


Step 6: LED, GPIO และ Gesture Control


_hYGFsxk58m.jpeg?auto=compress%2Cformat&w=740&h=555&fit=max)


จาก LED ดวงเดียว ไปต่อได้ไกลกว่าที่คิด
สิ่งที่น่าสนใจของโปรเจกต์นี้ ไม่ใช่แค่การทำให้ LED เปิดหรือปิดด้วยมือ
แต่คือ Workflow ทั้งเส้น:
Camera → Computer Vision → MemryX MX3 → Raspberry Pi Software → GPIO → Hardware จริง
ต้นฉบับสรุปไว้ว่าการ Blink LED เป็นเพียงจุดเริ่มต้น เพราะเมื่อ Computer Vision สามารถส่งผลไปยัง GPIO ได้แล้ว แนวคิดเดียวกันสามารถต่อยอดไปยัง Gesture-controlled Lighting, Smart Display, Robotics และ Automation Project อื่น ๆ ได้
สำหรับสาย Maker นี่จึงเป็นโปรเจกต์ที่เห็นภาพของ Edge AI ได้ชัดมาก: AI ไม่ได้จบอยู่ที่ Bounding Box บนหน้าจอ แต่สามารถกลายเป็น Input ให้ Hardware ตัดสินใจและตอบสนองกับโลกจริงได้
ติดตั้งจริง แนะนำให้เปิดต้นฉบับควบคู่ไปด้วย
บทความนี้มีหลายส่วนที่ขึ้นกับ Version: โดยเฉพาะ Driver, Linux Kernel, Python, SDK, Precompiled Model และ Repository Structure จึงแนะนำให้เปิด คู่มือต้นฉบับ Install MemryX MX3 on Raspberry Pi 5 ควบคู่กับ MemryX Developer Hub – Install Software ก่อนลงมือจริง
FAQ: MemryX MX3 กับ Raspberry Pi 5
ต้นฉบับใช้ Raspberry Pi รุ่นไหน?
Raspberry Pi 5 โดยระบุว่า 8GB Kit เป็นรุ่นที่แนะนำสำหรับโปรเจกต์นี้
ต้องมี PCIe HAT หรือไม่?
ใน Setup ของต้นฉบับใช้ M.2 to PCIe Raspberry Pi HAT สำหรับเชื่อม MemryX MX3 M.2 Accelerator เข้ากับ Raspberry Pi 5
ใช้ Raspberry Pi OS แบบไหน?
คู่มือต้นฉบับใช้ Raspberry Pi OS แบบ 64-bit และ MemryX Developer Hub ก็ระบุ Raspberry Pi OS 64-bit สำหรับ Raspberry Pi 5
ทำไมต้องใช้ Python 3.12?
ในเวลาที่บทความต้นฉบับจัดทำ Raspberry Pi OS มี Python 3.13 แต่ MemryX Tools ยังไม่รองรับ Version ดังกล่าว จึงใช้ uv ติดตั้ง Python 3.12 และสร้าง Virtual Environment
ต้องใช้ Webcam ไหม?
Webcam ใช้กับ MediaPipe Hands, YOLOE และโปรเจกต์ Gesture-controlled LED
MX3 ร้อนแค่ไหนถึงต้องระวัง?
Source และเอกสาร MemryX ระบุว่า Accelerator สามารถเริ่ม Thermal Throttling เมื่อ Chip ถึงประมาณ 100°C จึงต้องมี Cooling และ Airflow ที่เพียงพอ
โค้ด Gesture Control วางไว้ที่ไหนก็ได้ไหม?
ไม่ได้ตามโครงสร้างของคู่มือต้นฉบับ เพราะ Code อ้างอิง Module และ File ที่อยู่ใน MediaPipe Hands Example Directory จึงต้องบันทึกในตำแหน่งที่ Source กำหนด
References / แหล่งข้อมูลต้นฉบับ
อยากเริ่ม Edge AI Project ของตัวเอง?
ถ้ากำลังหา Raspberry Pi, บอร์ดพัฒนา, Sensor หรืออุปกรณ์สำหรับ Embedded / AI / Maker Project สามารถเข้ามาดูสินค้า พูดคุยกับ Community หรือส่งโจทย์มาสอบถามทีม Globalbyte ได้


