from tensorflow.keras import Sequential
from tensorflow.keras.models import load_model
import cv2
import numpy as np
from tensorflow.keras.preprocessing.image import img_to_array
# Load the model
model = Sequential()
classifier = load_model('ferjj.h5') # This model has a set of 6 classes
# We have 6 labels for the model
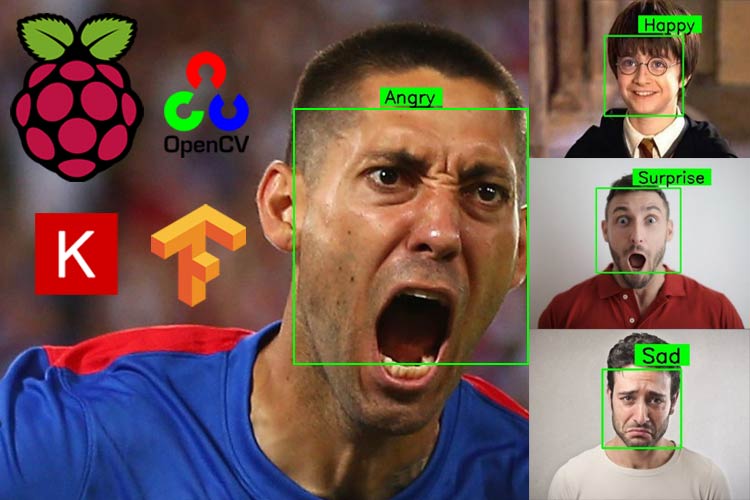
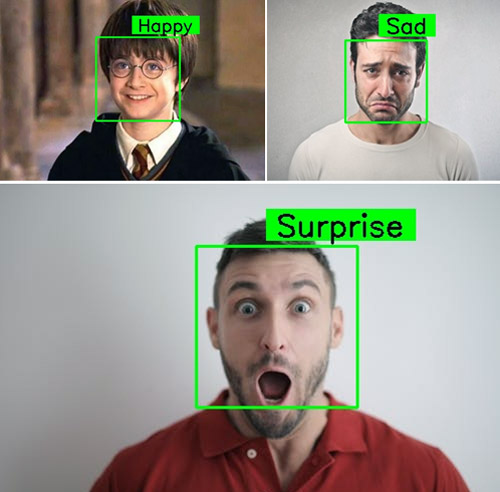
class_labels = {0: 'Angry', 1: 'Fear', 2: 'Happy', 3: 'Neutral', 4: 'Sad', 5: 'Surprise'}
classes = list(class_labels.values())
face_classifier = cv2.CascadeClassifier('./Haarcascades/haarcascade_frontalface_default.xml')
# This function is for designing the overlay text on the predicted image boxes.
def text_on_detected_boxes(text,text_x,text_y,image,font_scale = 1,
font = cv2.FONT_HERSHEY_SIMPLEX,
FONT_COLOR = (0, 0, 0),
FONT_THICKNESS = 2,
rectangle_bgr = (0, 255, 0)):
# get the width and height of the text box
(text_width, text_height) = cv2.getTextSize(text, font, fontScale=font_scale, thickness=2)[0]
# Set the Coordinates of the boxes
box_coords = ((text_x-10, text_y+4), (text_x + text_width+10, text_y - text_height-5))
# Draw the detected boxes and labels
cv2.rectangle(image, box_coords[0], box_coords[1], rectangle_bgr, cv2.FILLED)
cv2.putText(image, text, (text_x, text_y), font, fontScale=font_scale, color=FONT_COLOR,thickness=FONT_THICKNESS)
# Detection of the emotions on an image:
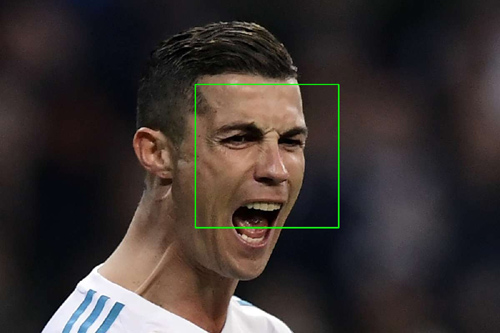
def face_detector_image(img):
gray = cv2.cvtColor(img.copy(), cv2.COLOR_BGR2GRAY) # Convert the image into GrayScale image
faces = face_classifier.detectMultiScale(gray, 1.3, 5)
if faces is ():
return (0, 0, 0, 0), np.zeros((48, 48), np.uint8), img
allfaces = []
rects = []
for (x, y, w, h) in faces:
cv2.rectangle(img, (x, y), (x + w, y + h), (0, 255, 0), 2)
roi_gray = gray[y:y + h, x:x + w]
roi_gray = cv2.resize(roi_gray, (48, 48), interpolation=cv2.INTER_AREA)
allfaces.append(roi_gray)
rects.append((x, w, y, h))
return rects, allfaces, img
def emotionImage(imgPath):
img = cv2.imread(imgPath)
rects, faces, image = face_detector_image(img)
i = 0
for face in faces:
roi = face.astype("float") / 255.0
roi = img_to_array(roi)
roi = np.expand_dims(roi, axis=0)
# make a prediction on the ROI, then lookup the class
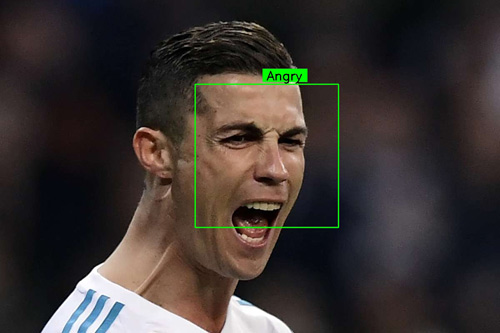
preds = classifier.predict(roi)[0]
label = class_labels[preds.argmax()]
label_position = (rects[i][0] + int((rects[i][1] / 2)), abs(rects[i][2] - 10))
i = + 1
# Overlay our detected emotion on the picture
text_on_detected_boxes(label, label_position[0],label_position[1], image)
cv2.imshow("Emotion Detector", image)
cv2.waitKey(0)
cv2.destroyAllWindows()
# Detection of the expression on video stream
def face_detector_video(img):
# Convert image to grayscale
gray = cv2.cvtColor(img, cv2.COLOR_BGR2GRAY)
faces = face_classifier.detectMultiScale(gray, 1.3, 5)
if faces is ():
return (0, 0, 0, 0), np.zeros((48, 48), np.uint8), img
for (x, y, w, h) in faces:
cv2.rectangle(img, (x, y), (x + w, y + h), (0, 255, 0), thickness=2)
roi_gray = gray[y:y + h, x:x + w]
roi_gray = cv2.resize(roi_gray, (48, 48), interpolation=cv2.INTER_AREA)
return (x, w, y, h), roi_gray, img
def emotionVideo(cap):
while True:
ret, frame = cap.read()
rect, face, image = face_detector_video(frame)
if np.sum([face]) != 0.0:
roi = face.astype("float") / 255.0
roi = img_to_array(roi)
roi = np.expand_dims(roi, axis=0)
# make a prediction on the ROI, then lookup the class
preds = classifier.predict(roi)[0]
label = class_labels[preds.argmax()]
label_position = (rect[0] + rect[1]//50, rect[2] + rect[3]//50)
text_on_detected_boxes(label, label_position[0], label_position[1], image)
fps = cap.get(cv2.CAP_PROP_FPS)
cv2.putText(image, str(fps),(5, 40), cv2.FONT_HERSHEY_SIMPLEX, 1, (0, 255, 0), 2)
else:
cv2.putText(image, "No Face Found", (5, 40), cv2.FONT_HERSHEY_SIMPLEX, 1, (255, 0, 0), 2)
cv2.imshow('All', image)
if cv2.waitKey(1) & 0xFF == ord('q'):
break
cap.release()
cv2.destroyAllWindows()
if __name__ == '__main__':
camera = cv2.VideoCapture(0) # If you are using an USB Camera then Change use 1 instead of 0.
emotionVideo(camera)
# IMAGE_PATH = "provide the image path"
# emotionImage(IMAGE_PATH) # If you are using this on an image please provide the path