สวัสดีชาว Maker และนักประดิษฐ์สาย IoT ทุกคนครับ! ในยุคที่ระบบมอนิเตอร์และ Smart Home โตไวแบบก้าวกระโดด การรู้ความเคลื่อนไหวแบบเรียลไทม์ถือเป็นเรื่องสำคัญมาก ไม่ว่าจะเป็นการดักจับผู้บุกรุก เช็คสถานะเครื่องจักร หรือนับจำนวนคนเข้าออกห้อง การที่เราต้องมานั่งเฝ้าหน้าจอตลอดเวลามันเป็นไปไม่ได้เลยใช่ไหมครับ?
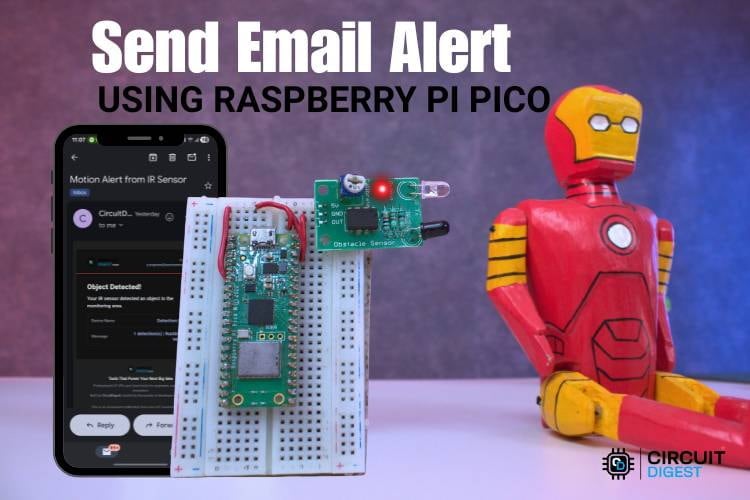
วันนี้เรามีทางออกสุดสมาร์ทมาฝากกัน! นั่นคือการสร้าง Email Alert System หรือระบบแจ้งเตือนผ่านอีเมลแบบอัตโนมัติ โดยใช้บอร์ดจิ๋วแต่แจ๋วอย่าง Raspberry Pi Pico W ทำงานร่วมกับ IR Sensor (เซนเซอร์อินฟราเรด) เมื่อมีคนหรือวัตถุเดินตัดผ่านเซนเซอร์ บอร์ดจะต่อ Wi-Fi แล้วยิงอีเมลแจ้งเตือนเข้ามือถือคุณทันที! (สำหรับใครที่เคยลองใช้ ESP32 มาก่อน สามารถดู how to Send Email Using ESP32 ได้เช่นกันครับ)
เตรียมอุปกรณ์ (Components Required)
งานนี้ฮาร์ดแวร์น้อยชิ้นมากครับ เน้นลงโค้ดแล้วใช้งานได้เลย:
อุปกรณ์ (Component)
จำนวน (Quantity)
Raspberry Pi Pico W (รุ่นมี Wi-Fi)
1 ชิ้น
IR Sensor (เซนเซอร์อินฟราเรด)
1 ชิ้น
Breadboard (แผงต่อวงจร)
1 แผง
Connecting Wires (สาย Jumper)
ตามความเหมาะสม
💡 Maker's Tip: โปรเจกต์แนว Security แบบนี้ เวลาเอาไปใช้งานจริง (เช่น ติดกำแพงหรือประตู) การปล่อยแผงวงจรเปลือยๆ อาจทำให้สายหลุดหรือโดนฝุ่นได้ง่ายครับ แนะนำให้ใช้ เครื่องปริ้นท์ 3D (3D Printer) ออกแบบและปริ้นท์เคสสวยๆ มาครอบบอร์ดและเซนเซอร์ไว้เลย!บอร์ด Raspberry Pi Pico W แท้, โมดูล IR Sensor หรืออยากได้ เส้นพลาสติก Filament คุณภาพดีสำหรับงาน 3D Print แวะมาเลือกช้อปของแต่งโปรเจกต์ได้ที่ Globalbyte เลยครับ!
ภาพรวมการทำงาน (Functional Overview)
หลักการทำงานของระบบนี้เข้าใจง่ายมากครับ ตัว IR Sensor จะคอยยิงแสงอินฟราเรดออกไป ถ้ามีวัตถุหรือคนเดินมาบัง แสงจะสะท้อนกลับมาเข้าตัวรับ (Receiver) ทำให้เซนเซอร์ส่งสัญญาณ Digital ออกมา (หากอยากรู้ลึกเรื่องเซนเซอร์ แวะไปดูได้ที่ Interfacing IR Sensor Module with Arduino )
เมื่อบอร์ด Pico W จับสัญญาณได้ว่ามีคนเดินผ่าน มันจะรวบรวมข้อมูลแพ็กใส่ไฟล์ JSON แล้วเชื่อมต่ออินเทอร์เน็ตเพื่อส่งคำขอ (HTTP POST) ไปที่ CircuitDigest Cloud Platform ผ่าน Email Notification API จากนั้นระบบคลาวด์ก็จะยิงอีเมลเข้ากล่องจดหมายของเราแบบทันทีทันใดครับ! (หรือถ้าใครอยากให้ส่งเป็น SMS ก็ลองดู How to send SMS using ESP32 เป็นไอเดียเสริมได้)
การต่อวงจรและการตั้งค่า (Circuit & Hardware Config)
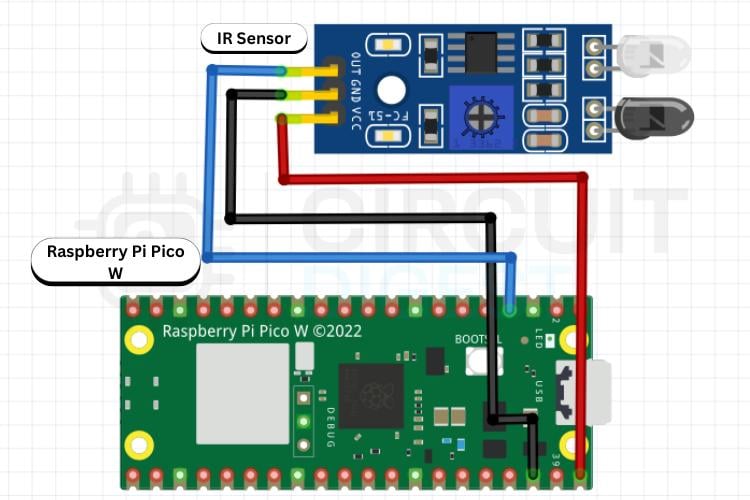
เสียบขาไฟเลี้ยง (3.3V และ GND) จากบอร์ด Pico W เข้ากับเซนเซอร์ และต่อขา Signal (OUT) ของ IR Sensor เข้ากับขา GPIO 2 ของ Pico W ครับ เพียงเท่านี้ก็พร้อมสำหรับการเขียนโค้ดแล้ว
คลิกดูภาพผังวงจร การต่ออุปกรณ์จริง และรูปอีเมลแจ้งเตือน (View more) ซ่อนภาพประกอบ (View less)
ผังการต่อวงจรเข้ากับ GPIO 2
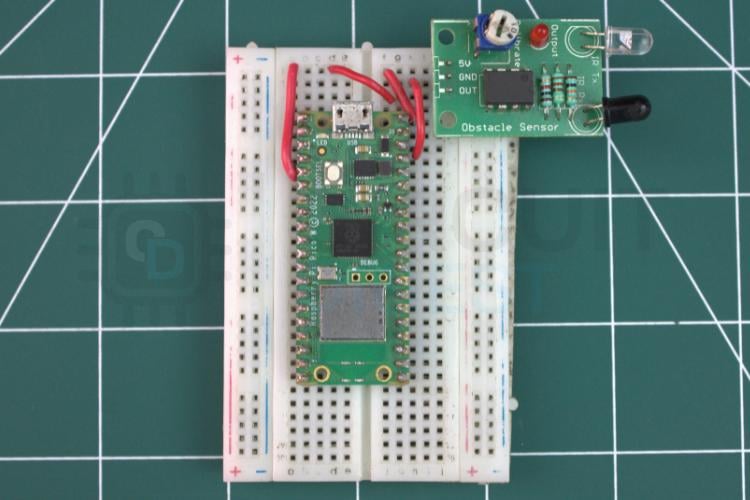
การต่อฮาร์ดแวร์จริงบน Breadboard
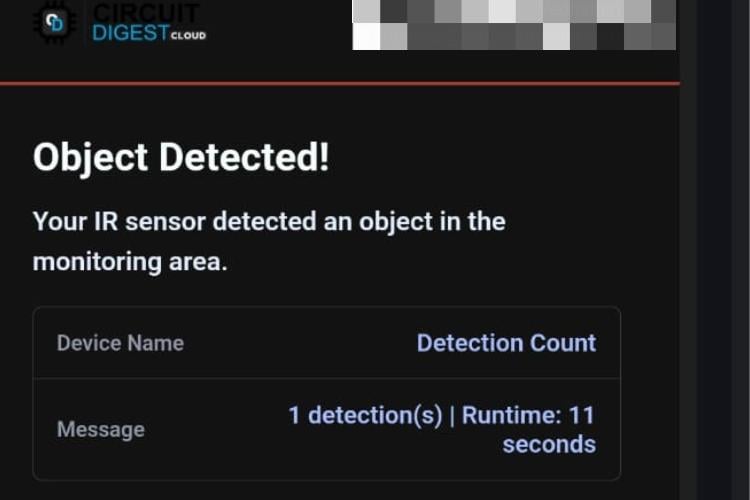
ตัวอย่างอีเมลแจ้งเตือนที่ได้รับเมื่อมีคนเดินผ่าน
วิดีโอสาธิตการทำงาน (Video Demonstration)
อยากรู้ว่าพอกดรันโค้ดแล้ว อีเมลจะเด้งเข้ามือถือไวแค่ไหน ลองกดดูวิดีโอสาธิตการทำงานด้านล่างนี้ได้เลยครับ
VIDEO
เจาะลึกโค้ดการทำงาน (Code Explanation)
โค้ดโปรเจกต์นี้เขียนด้วยภาษา C++/Arduino โดยสามารถแบ่งการทำงานออกเป็น 4 ส่วนหลักๆ ครับ:
1. การนำเข้าไลบรารีและกำหนดขา: ใช้ WiFi.h และ WiFiClientSecure.h สำหรับต่อเน็ตและเชื่อมต่อ HTTPS อย่างปลอดภัย พร้อมเซ็ตขาเซนเซอร์ #define IR_SENSOR_PIN 2
2. การตั้งค่า Wi-Fi และ API: กำหนดรหัส Wi-Fi, ข้อมูล Host (www.circuitdigest.cloud), API Key, และ Email ปลายทาง
3. การสร้าง Payload สำหรับส่งอีเมล (sendEmail): โค้ดจะสร้างชุดข้อมูล JSON (ประกอบด้วย หัวข้ออีเมล, ข้อความ, และจำนวนครั้งที่ตรวจพบ) จากนั้นส่งแบบ HTTP POST ไปที่ API
4. ฟังก์ชัน Loop: ระบบจะอ่านค่าจาก GPIO 2 ทุกๆ 500ms หากสถานะเป็น LOW (ตรวจพบวัตถุ) และคงอยู่ตามเวลาที่กำหนด (เช่น 2 วินาที) ระบบจะเรียกใช้ฟังก์ชันส่งอีเมลทันที พร้อมป้องกันการส่งเมลซ้ำซ้อนด้วยตัวแปร emailSent
โค้ดฉบับเต็ม (Complete Project Code)
ก๊อปปี้โค้ดด้านล่างนี้ไปปรับแก้รหัส Wi-Fi และ API Key ของคุณ แล้วอัปโหลดลงบอร์ด Raspberry Pi Pico W ผ่าน Arduino IDE ได้เลยครับ!
#include <WiFi.h>
#include <WiFiClientSecure.h>

/* ================= IR SENSOR ================= */
#define IR_SENSOR_PIN 2  // GPIO2 for IR sensor
// IR sensor outputs:
// HIGH (1) = No object detected
// LOW (0) = Object detected

/* ================= WIFI DETAILS ================= */
const char* ssid = "Yourssid";
const char* password = "Password";

/* ================= EMAIL API DETAILS ================= */
const char* host = "www.circuitdigest.cloud";
const int port = 443;
const char* apiKey = "yourapikey";
const char* toEmail = "yourregismailid";
const int templateID = 1001;

/* ================= SETTINGS ================= */
const unsigned long READ_INTERVAL = 500;      // Check every 500ms for faster detection
const unsigned long RETRY_DELAY = 10000;      // 10 seconds between emails
const unsigned long DETECTION_DURATION = 2000; // Object must be detected for 2 seconds

/* ================= FLAGS AND COUNTERS ================= */
bool emailSent = false;
bool objectDetected = false;
unsigned long lastReadTime = 0;
unsigned long lastEmailAttempt = 0;
unsigned long detectionStartTime = 0;
int detectionCount = 0;
int totalDetections = 0;

/* ================= SEND EMAIL ================= */
bool sendEmail(int detections) {
 WiFiClientSecure client;
 Serial.println("\n Connecting to server...");
 // Disable SSL certificate verification (for development)
 client.setInsecure();
 if (!client.connect(host, port)) {
   Serial.println(" HTTPS connection failed");
   return false;
 }

 /* -------- BUILD COMPLETE JSON PAYLOAD -------- */
 char payload[512];
 char timestamp[32];
 unsigned long currentTime = millis() / 1000; // Convert to seconds
 snprintf(timestamp, sizeof(timestamp), "%lu seconds", currentTime);

 snprintf(payload, sizeof(payload),
   "{"
   "\"to_email\":\"%s\","
   "\"template_id\":%d,"
   "\"variables\":{"
     "\"subject\":\"Motion Alert from IR Sensor\","
     "\"title\":\"Object Detected!\","
     "\"description\":\"Your IR sensor detected an object in the monitoring area.\","
     "\"var1\":\"Detection Count\","
     "\"var2\":\"%d detection(s) | Runtime: %s\""
   "}}",
   toEmail, templateID, detections, timestamp
 );

 /* -------- SEND HTTP REQUEST -------- */
 client.println("POST /api/v1/email/send HTTP/1.1");
 client.print("Host: "); client.println(host);
 client.print("Authorization: "); client.println(apiKey);
 client.println("Content-Type: application/json");
 client.print("Content-Length: "); client.println(strlen(payload));
 client.println("Connection: close");
 client.println();
 client.println(payload);

 Serial.println(" Sending payload:");
 Serial.println(payload);

 /* -------- WAIT FOR RESPONSE -------- */
 unsigned long timeout = millis();
 while (!client.available()) {
   if (millis() - timeout > 10000) {
     Serial.println(" Server timeout");
     client.stop();
     return false;
   }
 }

 /* -------- READ AND PARSE RESPONSE -------- */
 bool success = false;
 Serial.println("\n Server response:");
 while (client.available()) {
   String line = client.readStringUntil('\n');
   Serial.println(line);
   if (line.indexOf("200 OK") >= 0 || line.indexOf("\"success\":true") >= 0) {
     success = true;
   }
 }
 client.stop();
 if (success) {
   Serial.println("\n Email sent successfully!");
 } else {
   Serial.println("\n Email may have failed - check response above");
 }
 return success;
}

/* ================= SETUP ================= */
void setup() {
 Serial.begin(115200);
 delay(1000);
 Serial.println("\n IR Motion Detection Alert System - Pico W");

 pinMode(IR_SENSOR_PIN, INPUT);
 int initialState = digitalRead(IR_SENSOR_PIN);

 Serial.print("Connecting to WiFi: ");
 Serial.println(ssid);
 WiFi.mode(WIFI_STA);
 WiFi.begin(ssid, password);

 int attempts = 0;
 while (WiFi.status() != WL_CONNECTED && attempts < 30) {
   delay(500);
   Serial.print(".");
   attempts++;
 }
 Serial.println();
 if (WiFi.status() == WL_CONNECTED) {
   Serial.println(" WiFi connected successfully!");
   Serial.print(" IP Address: ");
   Serial.println(WiFi.localIP());
 } else {
   Serial.println(" WiFi connection failed!");
 }
}

/* ================= LOOP ================= */
void loop() {
 unsigned long currentMillis = millis();

 if (currentMillis - lastReadTime < READ_INTERVAL) { return; }
 lastReadTime = currentMillis;

 if (WiFi.status() != WL_CONNECTED) {
   WiFi.begin(ssid, password);
   delay(5000);
   return;
 }

 int sensorState = digitalRead(IR_SENSOR_PIN);
 bool currentDetection = (sensorState == LOW);

 if (currentDetection) {
   if (!objectDetected) {
     objectDetected = true;
     detectionStartTime = currentMillis;
     totalDetections++;
     Serial.println(" OBJECT DETECTED!");
   }
   unsigned long detectionDuration = currentMillis - detectionStartTime;

   if (detectionDuration >= DETECTION_DURATION && !emailSent) {
     if (currentMillis - lastEmailAttempt > RETRY_DELAY) {
       lastEmailAttempt = currentMillis;
       if (sendEmail(totalDetections)) {
         emailSent = true;
       }
     }
   }
 } else {
   if (objectDetected) {
     objectDetected = false;
     emailSent = false;
     Serial.println(" Object cleared\n");
   }
 }
}
คลิกดู Source Code ฉบับเต็ม (View full code) ซ่อนโค้ด (View less)
เจอปัญหา? คลิกดูวิธีแก้ปัญหา (Troubleshooting) และไอเดียต่อยอดที่นี่ ซ่อนวิธีแก้ปัญหาและไอเดียต่อยอด
การแก้ปัญหาเบื้องต้น (Troubleshooting)
เซนเซอร์รวน แจ้งเตือนมั่ว (False Detection): อาจเกิดจากแสงแดดสะท้อนหรือคลื่นรบกวน ลองหมุนตัวต้านทานปรับค่า (Potentiometer) บนโมดูล IR เพื่อลดความไว (Sensitivity) หรือเพิ่มเวลา DETECTION_DURATION ในโค้ดให้ระบบรอจนชัวร์ก่อนส่งเมลครับ
ส่งอีเมลซ้ำรัวๆ ไม่หยุด: โค้ดของเรามีระบบป้องกันการส่งซ้ำแล้วด้วยตัวแปร emailSent แต่ถ้ายังมีปัญหา ให้ลองเพิ่มค่า RETRY_DELAY ในโค้ดครับ
ไม่ได้รับอีเมลเลย: เช็ค API Key, รหัส Wi-Fi และ Template ID ในโค้ดให้ถูกต้อง และอย่าลืมไปเช็คใน โฟลเดอร์จดหมายขยะ (Spam) ในอีเมลของคุณด้วยนะ!
เซนเซอร์ไม่ตรวจจับอะไรเลย: เช็คสายไฟ 3.3V และ GND ว่าต่อแน่นไหม และสถานะตอนปกติควรเป็น HIGH เมื่อเจอคนควรเป็น LOW ครับ
ไอเดียเอาไปใช้จริง (Applications)
บอกเลยว่าโปรเจกต์นี้เอาไปต่อยอดทำ electronics projects เจ๋งๆ ได้เพียบ! เช่น:
ระบบกันขโมยบ้าน (Home Security) ถ่ายรูปหรือส่งอีเมลเวลามีคนบุกรุกตอนกลางคืน
ระบบเช็คคนเข้าออกออฟฟิศหรือโกดัง (Warehouse Monitoring)
ตู้ไปรษณีย์อัจฉริยะ (Smart Mailbox) ส่งเมลแจ้งเตือนเมื่อมีจดหมายมาหย่อนลงตู้
หรือจะต่อยอดไปทำ IoT Raspberry Pi Smart Container แจ้งเตือนอีเมลเวลาถังขยะเต็มก็ยังได้!
*คำเตือน: เนื้อหานี้เป็นการสรุปและเรียบเรียงแนวคิดจากโปรเจกต์ต้นฉบับภาษาอังกฤษ ข้อมูลและขั้นตอนการต่อวงจรบางส่วนอาจถูกย่อทอนเพื่อให้เข้าใจง่าย โค้ดที่แสดงในบทความอาจต้องมีการปรับแก้ตั้งค่า Wi-Fi และ API Key ให้ตรงกับบัญชีของผู้ใช้งาน ผู้สนใจสามารถศึกษารายละเอียดเชิงลึกและดาวน์โหลดไฟล์ต้นฉบับได้จาก
เว็บไซต์ต้นฉบับ