
Water Leak Detector IoT: Particle Photon แจ้งเตือนเข้ามือถือ
น้ำรั่วตอนเราอยู่บ้านอาจเห็นได้ทัน แต่ถ้าเกิดใต้เครื่องทำน้ำร้อน ข้างเครื่องซักผ้า หรือบริเวณที่เราไม่ได้เดินผ่านหลายวันล่ะ? Project นี้แก้โจทย์ด้วย Water Leak Sensor + Particle Photon แล้วส่ง Event ผ่าน Cloud ไปแจ้งเตือนบนมือถือหรือคอมพิวเตอร์
สิ่งที่น่าสนใจไม่ใช่แค่การตรวจเจอน้ำ แต่คือ Architecture ครบเส้นทาง: Sensor ตรวจน้ำ → Particle Publish Event → Cloud Webhook → Pushbullet → Notification พร้อม Logic ที่ไม่ยิงแจ้งเตือนทุก 2 วินาทีจนผู้ใช้รำคาญ
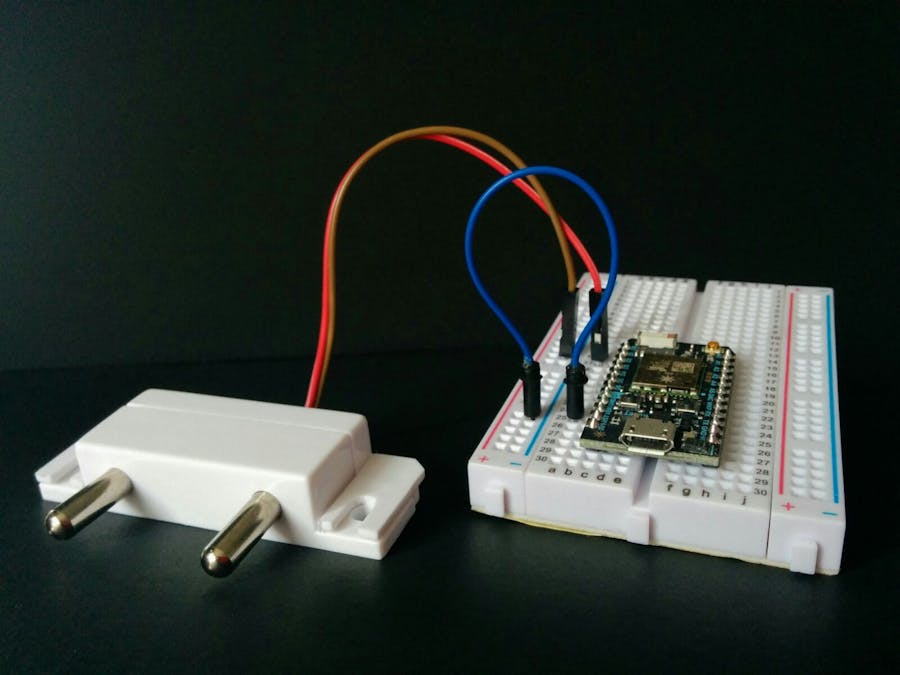
- ใช้ Particle Photon หรือ Spark Core เพียงหนึ่งบอร์ด
- Water Leak Sensor ต่อระหว่าง GND กับ D0
- D0 ใช้ INPUT_PULLUP
- Firmware ตรวจ Sensor ทุกประมาณ 2 วินาที
- เมื่อพบน้ำ On-board LED ที่ D7 ถูกเปิด
- Notification แรกถูกตั้งไว้ที่ 10 วินาที ไม่ใช่ทันทีในวินาทีแรก
- หากน้ำยังอยู่ ระบบแจ้งซ้ำที่ 1 นาที, 5 นาที, 15 นาที, 1 ชั่วโมง และทุก 4 ชั่วโมงหลังจากนั้น
- Firmware ส่ง Event ชื่อ pushbullet ไป Particle Cloud
- Webhook ส่ง HTTP POST ไป Pushbullet
- Pushbullet Access Token เป็น Secret และห้ามเผยแพร่
- Original Code ใช้ Spark.publish() ซึ่งเป็น API naming จากยุคเดิมของ Particle
Water Detection System นี้คืออะไร?
Project ถูกสร้างขึ้นเพื่อแก้ Pain Point ง่าย ๆ: ถ้าน้ำเริ่มรั่วขณะที่ไม่มีใครอยู่ใกล้บริเวณนั้น ให้ Sensor ตรวจพบเหตุการณ์ แล้วส่ง Notification ออกไปหาเจ้าของ
Use Case ที่ผู้สร้างยกตัวอย่างมีตั้งแต่:
- Basement
- Aquarium
- Water heater
- Pipe
- Sump pump
- Dishwasher
- Washing machine
ใช้ Hardware อะไรบ้าง?

| อุปกรณ์ | บทบาท |
|---|---|
| Particle Photon | Wi-Fi Development Board + Particle Cloud |
| หรือ Spark Core | ใช้แทน Photon ได้ใน Original Project แต่ไม่ต้องใช้สองบอร์ดพร้อมกัน |
| Water Leak Sensor | ตรวจว่ามีน้ำทำให้ Contact เปลี่ยนสถานะหรือไม่ |
| Pushbullet | รับ Push จาก Webhook และส่ง Notification ไปยัง Device |

Photon / Spark Core ในปัจจุบันเป็นอย่างไร?
Project ต้นฉบับถูกสร้างในปี 2015 จึงอิง Hardware Ecosystem ของ Particle ในช่วงนั้น
Photon รุ่นดั้งเดิมถูกเลิกผลิตแล้ว และ Particle แนะนำ Hardware รุ่นใหม่กว่าเป็นตัวแทน ขณะที่ Spark Core เป็น Platform รุ่นเก่ากว่า Photon อีกชั้น
Water Leak Sensor ตรวจน้ำอย่างไร?
Source อธิบายแนวคิดแบบง่าย: มี Contact สองฝั่ง และเมื่อ Water Leak Sensor ถูกน้ำสัมผัส สถานะทางไฟฟ้าระหว่าง Contact เปลี่ยนไป
Project ใช้ Internal Pull-up Resistor ของ Particle ดังนั้น Sensor ถูกต่อระหว่าง:
GND ↔ Water Leak Sensor ↔ D0
Firmware อ่าน D0 ด้วย:
INPUT_PULLUP
และ Logic ใน Source ตรวจ:
not digitalRead(FLOOD_SENSOR)
เมื่อ Input ถูก Pull Low Code จึงมองว่าเกิด Flood / Water Detection
ต่อ Water Leak Sensor กับ D0 อย่างไร?
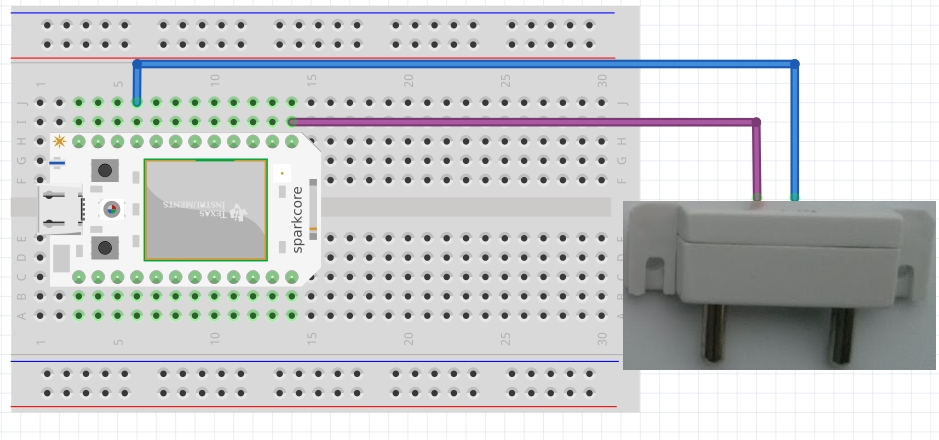
| Water Leak Sensor | Particle |
|---|---|
| Contact ฝั่งหนึ่ง | GND |
| Contact อีกฝั่ง | D0 |
ไม่มี External Pull-up Resistor ใน Logic ของ Project เพราะใช้ Internal Pull-up จาก Particle
น้ำหนึ่งหยดกลายเป็น Notification ได้ยังไง?

ตรวจว่ามีน้ำหรือไม่
Firmware ตรวจ Digital Input D0
รับ Event ชื่อ pushbullet
รับ HTTP POST เพื่อสร้าง Push
ผู้ใช้ได้รับ Notification
Firmware ตรวจ Sensor ทุกกี่วินาที?
Source Code กำหนด:
FLOOD_READ_INTERVAL 2000
หมายถึง Logic ตรวจ Water Leak ถูกเรียกเป็นช่วงประมาณทุก 2 วินาที
เมื่อพบ Water Detection ครั้งแรก:
- ตั้ง flood_detected = true
- Reset Alarm Timer
- ตั้ง Alarm แรกตาม Schedule
- เปิด LED ที่ D7
ทำไมไม่แจ้งเตือนทุก 2 วินาที?
ถ้าน้ำยังค้างอยู่ การ Push Notification ทุกครั้งที่ Sensor ถูกอ่าน จะทำให้เกิด Alert จำนวนมาก
ผู้สร้างจึงตั้ง Notification Schedule แบบไล่ช่วงเวลา
| ลำดับ | เวลาที่ Source กำหนด |
|---|---|
| Alert 1 | 10 วินาที |
| Alert 2 | 1 นาที |
| Alert 3 | 5 นาที |
| Alert 4 | 15 นาที |
| Alert 5 | 1 ชั่วโมง |
| Alert 6 เป็นต้นไป | ทุก 4 ชั่วโมง จนกว่าจะไม่ตรวจพบน้ำ |
Particle Firmware ทำงานอย่างไร?

Firmware ต้นฉบับประกอบด้วยสอง Function หลัก:
- flood_check() — อ่าน Water Leak Sensor และควบคุมสถานะ
- flood_notify_user() — Publish Notification ตาม Schedule
Source ระบุ Firmware Version: 0.04
// This #include statement was automatically added by the Particle IDE.
#include "elapsedMillis/elapsedMillis.h"

String _version = "0.04";

//this reads the flood sensor every 2 seconds
#define FLOOD_READ_INTERVAL 2000

//this defines the frequency of the notifications sent to the user
#define FLOOD_FIRST_ALARM 10000 //10 seconds
#define FLOOD_SECOND_ALARM 60000 //1 minute
#define FLOOD_THIRD_ALARM 300000 //5 minutes
#define FLOOD_FOURTH_ALARM 900000 //15 minutes
#define FLOOD_FIFTH_ALARM 3600000 //1 hour
#define FLOOD_SIXTH_ALARM 14400000 //4 hours - and every 4 hours ever after, until the situation is rectified (ie no more water is detected)

#define FLOOD_NOTIF "FLOOD"

elapsedMillis flood_timer;
elapsedMillis flood_alarm_timer;

int flood_alarms_array[6]={
    FLOOD_FIRST_ALARM,
    FLOOD_SECOND_ALARM,
    FLOOD_THIRD_ALARM,
    FLOOD_FOURTH_ALARM,
    FLOOD_FIFTH_ALARM,
    FLOOD_SIXTH_ALARM
};

int flood_alarm_index = 0;
bool flood_detected = false;
unsigned long flood_next_alarm = 0;

int FLOOD_SENSOR = D0;
int LED = D7;

void setup() {
    pinMode(FLOOD_SENSOR, INPUT_PULLUP);
    pinMode(LED, OUTPUT);
    Spark.publish("device starting", "Firmware version: " + _version, 60, PRIVATE);
}

void loop() {

    flood_check();

    if ( flood_detected ) {
        flood_notify_user();
    }
}

/*******************************************************************************
 * Function Name  : flood_check
 * Description    : check water leak sensor at FLOOD_READ_INTERVAL, turns on led on D7 and raises alarm if water is detected
 * Return         : 0
 *******************************************************************************/
int flood_check()
{
    if (flood_timer < FLOOD_READ_INTERVAL) {
        return 0;
    }

    //time is up, so reset timer
    flood_timer = 0;

    if (not digitalRead(FLOOD_SENSOR)) {

        //if flood is already detected, no need to do anything, since an alarm will be fired
        if (flood_detected){
            return 0;
        }

        flood_detected = true;

        //reset alarm timer
        flood_alarm_timer = 0;

        //set next alarm
        flood_alarm_index = 0;
        flood_next_alarm = flood_alarms_array[0];

        digitalWrite(LED,HIGH);

    } else {

        digitalWrite(LED,LOW);
        flood_detected = false;
    }

    return 0;
}

/*******************************************************************************
 * Function Name  : flood_notify_user
 * Description    : will fire notifications to user at scheduled intervals
 * Return         : 0
 *******************************************************************************/
int flood_notify_user()
{

    if (flood_alarm_timer < flood_next_alarm) {
        return 0;
    }

    //time is up, so reset timer
    flood_alarm_timer = 0;

    //set next alarm or just keep current one if there are no more alarms to set
    if (flood_alarm_index < arraySize(flood_alarms_array)-1) {
        flood_alarm_index = flood_alarm_index + 1;
        flood_next_alarm = flood_alarms_array[flood_alarm_index];
    }

    //send an alarm to user (this one goes to the dashboard)
    Spark.publish(FLOOD_NOTIF, "Flood detected!", 60, PRIVATE);

    //send an alarm to user (this one goes to pushbullet servers)
    Spark.publish("pushbullet", "Flood detected!", 60, PRIVATE);

    return 0;
}Spark.publish() คืออะไร และต่างจาก Particle ปัจจุบันยังไง?
Original Code ใช้:
Spark.publish()
เพื่อ Publish Event ขึ้น Particle Cloud ตัวอย่าง Event สำหรับ Pushbullet คือ:
pushbullet
และ Value คือ:
Flood detected!
Particle Documentation ปัจจุบัน ใช้ Naming ในรูป: Particle.publish()
Webhook เชื่อม Particle กับ Pushbullet อย่างไร?

Firmware ไม่ได้เรียก Pushbullet API โดยตรง แต่ Publish Event ไป Particle Cloud ก่อน
Webhook ที่ตั้งไว้จะตรวจ Event ชื่อ:
pushbullet
แล้วทำ HTTP POST ไปยัง:
https://api.pushbullet.com/v2/pushes
Pushbullet Access Token ต้องระวังอะไร?
ผู้สร้างเตือนไว้ตรง ๆ ว่า Pushbullet Access Token ให้สิทธิ์เข้าถึง Account และไม่ควรแชร์ให้ผู้อื่น
Pushbullet Documentation ปัจจุบัน ยังใช้ Access Token สำหรับ Authentication แต่รูปแบบ Header ที่ยกตัวอย่างใน Documentation ปัจจุบัน ต่างจาก Historical webhook.json ของ Project
webhook.json จากปี 2015 ยังใช้ตรง ๆ ได้ไหม?
ด้านล่างคือ Structure จาก Source ต้นฉบับ โดยเปลี่ยนเฉพาะ Token ตัวอย่าง เป็น Placeholder เพื่อไม่ให้ดูเหมือน Credential จริง
{
  "eventName": "pushbullet",
  "url": "https://api.pushbullet.com/v2/pushes",
  "requestType": "POST",
  "headers": {
    "Authorization": "Bearer YOUR_PUSHBULLET_ACCESS_TOKEN",
    "Content-Type": "application/json"
  },
  "json": {
    "type": "note",
    "title": "{{SPARK_EVENT_VALUE}}",
    "body": ""
  },
  "mydevices": true
}สร้าง Webhook ผ่าน Particle CLI
Source ใช้ Particle CLI เพื่อ Upload Webhook Configuration จากไฟล์ webhook.json
particle webhook create webhook.jsonCommand รูปแบบนี้ยังปรากฏใน Particle CLI Documentation ปัจจุบัน สำหรับ User Webhook
เมื่อพบน้ำ ผู้ใช้ได้รับอะไร?

Source ระบุว่าในการทดสอบ เมื่อนำ Water Leak Sensor ไปสัมผัสน้ำ:
- LED บน Particle Development Kit จะติด
- ประมาณ 10 วินาทีต่อมา Notification แรกถูกส่ง
- หากสถานะน้ำยังคงอยู่ Notification จะทำงานตาม Schedule ที่กำหนด
ถ้าต้องตรวจหลายจุดทำได้ไหม?
ผู้สร้างเสนอไว้สองแนวทาง:
- ต่อ Water Leak Sensor เพิ่มไปยัง Digital Input อื่น แล้วแก้ Firmware ให้รองรับแต่ละ Input
- ต่อ Sensor หลายตัวในรูปแบบ Parallel ตาม Project อ้างอิงที่ผู้สร้างลิงก์ไว้
Project นี้ตรวจอะไรไม่ได้?
ระบบนี้เป็น Binary Leak / Water Presence Alarm ไม่ใช่เครื่องมือ Measurement แบบต่อเนื่อง
| สิ่งที่ Project ทำ | สิ่งที่ Source ไม่ได้ทำ |
|---|---|
| ตรวจว่ามีน้ำสัมผัส Sensor หรือไม่ | วัดความสูงของน้ำ |
| เปิด LED เมื่อ Detect | วัดปริมาตรน้ำ |
| Publish Cloud Event | วัดอัตราการรั่ว |
| ส่ง Notification ตามเวลา | ปิดวาล์วน้ำอัตโนมัติ |
| ใช้ Pushbullet เป็นปลายทาง | มีระบบ Backup Communication |
Source ยังไม่ได้ให้:
- Waterproof Enclosure
- Battery Backup
- Wi-Fi Failure Detection
- Sensor Self-test
- Automatic Shutoff Valve
- Alarm Certification
- False-positive / False-negative Test
ถ้าสร้างใหม่วันนี้ควรเรียนรู้อะไรจาก Architecture นี้?
1. Sensor Logic ควรง่าย
Water Detection ไม่จำเป็นต้องเริ่มจาก AI หากโจทย์คือ Binary Event Digital Input หนึ่งขาก็เพียงพอสำหรับต้นแบบ
2. Device ไม่จำเป็นต้องเรียกทุก API เอง
Firmware Publish Event ไป Cloud แล้วใช้ Webhook เป็น Integration Layer ทำให้ Logic ฝั่ง Device เรียบง่ายขึ้น
3. Sensor Polling กับ User Notification ควรแยกกัน
Device ตรวจสถานะทุก 2 วินาทีได้ แต่ผู้ใช้ไม่จำเป็นต้องถูกแจ้งเตือนทุก 2 วินาที
4. Alarm Escalation ช่วยลด Notification Spam
Project เริ่มจาก 10 วินาที แล้วเพิ่มช่วงห่างไปจนถึงทุก 4 ชั่วโมง หากปัญหายังไม่ถูกแก้
5. Credential เป็นส่วนหนึ่งของ Security Design
Pushbullet Access Token ไม่ควรถูกฝังใน Source ที่เผยแพร่สาธารณะ
6. Tutorial เก่าควรแยก Concept ออกจาก Implementation
Architecture ยังน่าเรียนรู้ แต่ Hardware, API, Authentication และ Cloud Schema สามารถเปลี่ยนได้ตามเวลา
โปรเจกต์นี้มีหลายขั้น แนะนำอ่านต้นฉบับควบคู่กัน
หากต้องการทดลองกับ Particle Ecosystem ปัจจุบัน ควรอ่านทั้ง Original Project และ Official Documentation รุ่นล่าสุด โดยเฉพาะเรื่อง Hardware, Publish API, Webhook Schema และ Pushbullet Authentication
FAQ: คำถามที่พบบ่อย
1. Project นี้ใช้ Particle Photon หรือ Spark Core?
Source ระบุว่าใช้ Photon หรือ Core อย่างใดอย่างหนึ่ง ไม่จำเป็นต้องใช้สองบอร์ดพร้อมกัน
2. Water Leak Sensor ต่อเข้าขาไหน?
Source ต่อ Sensor ระหว่าง GND กับ D0
3. ต้องใช้ External Pull-up Resistor ไหม?
Original Project ใช้ Internal Pull-up โดยตั้ง D0 เป็น INPUT_PULLUP
4. พบน้ำแล้ว Logic เป็น HIGH หรือ LOW?
Firmware ตรวจ not digitalRead(FLOOD_SENSOR) ดังนั้น Water Detection ใน Project นี้ เกิดเมื่อ Input ถูกอ่านเป็น Low
5. LED ใช้ขาไหน?
Source กำหนด LED เป็น D7
6. Firmware อ่าน Sensor บ่อยแค่ไหน?
ทุกประมาณ 2000 ms หรือ 2 วินาทีตาม Code
7. Notification แรกมาทันทีไหม?
ไม่ Alarm แรกถูกตั้งไว้ที่ 10 วินาที หลังเริ่มสถานะ Flood Detection
8. ถ้าน้ำยังอยู่ ระบบแจ้งเตือนบ่อยแค่ไหน?
Source ตั้งไว้ที่ 10 วินาที, 1 นาที, 5 นาที, 15 นาที, 1 ชั่วโมง และทุก 4 ชั่วโมงหลังจากนั้น
9. ใช้ Service อะไรส่ง Notification?
Original Project ใช้ Pushbullet
10. Device เรียก Pushbullet โดยตรงไหม?
ไม่ Firmware Publish Event ไป Particle Cloud แล้ว Webhook เป็นตัวเรียก Pushbullet API
11. Cloud Event ชื่ออะไร?
Webhook สำหรับ Notification ใช้ Event ชื่อ pushbullet
12. Pushbullet Endpoint คืออะไร?
Source ใช้ https://api.pushbullet.com/v2/pushes
13. สามารถแชร์ Pushbullet Access Token ได้ไหม?
ไม่ Token ให้สิทธิ์เข้าถึง Account และควรถูกเก็บเป็น Secret
14. webhook.json ใน Source ใช้ได้ตรง ๆ ในปัจจุบันไหม?
ไม่ควรถือว่าใช้ได้แบบตรง ๆ เพราะ Particle Webhook Schema และ Pushbullet Authentication Documentation ปัจจุบัน มีรายละเอียดต่างจาก Original Configuration
15. คำสั่ง particle webhook create webhook.json ยังมีไหม?
Particle CLI Documentation ปัจจุบัน ยังมีคำสั่งรูปแบบนี้สำหรับสร้าง User Webhook
16. Particle Photon รุ่นเดิมยังเป็น Hardware ปัจจุบันไหม?
Particle ระบุว่า Photon รุ่นเดิมถูก Discontinued และแนะนำ Hardware รุ่นใหม่กว่าเป็น Substitute
17. Project นี้วัดระดับน้ำได้ไหม?
ไม่ Source ใช้ Sensor เป็น Water Presence / Leak Detection และไม่ได้ให้ Depth หรือ Water-level Measurement
18. Project ปิดวาล์วน้ำอัตโนมัติไหม?
ไม่ Source ไม่มี Relay, Valve Control หรือ Automatic Shutoff Wiring
19. ต่อ Sensor หลายจุดได้ไหม?
ผู้สร้างเสนอว่าสามารถเพิ่ม Sensor ที่ Digital Input อื่นและแก้ Firmware หรือใช้แนวทางต่อ Parallel แต่ Source นี้ไม่ได้ให้ Wiring เต็มสำหรับ Multi-sensor System
20. ระบบนี้รับประกันว่าจะป้องกันน้ำท่วมได้ไหม?
ไม่ Source นำเสนอเป็นระบบตรวจจับและแจ้งเตือน ไม่ได้ให้ Reliability Certification, Redundancy หรือการรับรองระบบ Flood Protection
References / แหล่งข้อมูลต้นฉบับ
IoT Alarm ที่ดี ไม่จำเป็นต้องเริ่มจากระบบซับซ้อน
Water Leak Detector Project นี้แสดง Pattern ที่ยังใช้เรียนรู้ได้ดี: Digital Sensor → Development Board → Cloud Event → Webhook → Notification พร้อม Alarm Schedule ที่แยกออกจาก Sensor Polling
หากกำลังเริ่มทำ IoT Alarm, Water Leak Monitoring หรือ Sensor Project สามารถสอบถามทีม Globalbyte เรื่อง Development Board, ESP32, Sensor, Module และ Maker Accessories ที่เหมาะกับ Project ได้


